Route Map may be used for policy based routing and route
redistribution on the switch.
Route Map table contains route
map name, sequence number, and access status (Permit/Deny). Route maps
can be used in policy based routing and route redistribution.
Route Map provides a set of rules which should be satisfied for
a route to be redistributed from one routing domain to another.
When a route is to be redistributed from a routing domain to another,
it is checked against a set of match conditions. If the match conditions
are satisfied, access control of Permit/Deny is provided to the
route. Route Map permits modifying of route information during redistribution
and setting conditions using the match clause and sets actions using
the set clause.
To access Route Map screens, go to .
Route Map Creation
By
default, the tab Route Map Creation displays
the Route Map Creation screen.
Figure 1. Route Map Creation

| Screen Objective |
This screen allows the user to create Route
Map which can be used in policy based routing and route redistribution. |
| Navigation |
|
| Fields |
- Route Map Name—enter
the Route Map Name to identify the specified Route Map from the
list of route maps. The value is a string of maximum size 20.
- Route Map Sequence Number—enter the number
that indicates position of a new route map in the list of route
maps already configured with the same name. This value range is
from 1 to 10. The default value is 1.
|
| Fields |
- Route Map Access—select
the access type associated with the sequence number in a route map.
Once an instance of this object is created, its value cannot be changed.
The default option is Permit. Options are:
- Permit—sets the
access type associated with sequence number in a route map as Permit.
This permits matching of route entry with entry rules.
- Deny—sets the access type associated with sequence number in
a route-map as Deny. This denies the route entry to match entry
rules.
|
| Buttons |
- Create—adds
and saves new configuration.
- Reset—resets to default value for respective
fields and discards all user input.
- Apply—modifies attributes and saves the
changes.
- Delete—deletes the selected entry.
|
Route Map Match
Figure 2. Route Map Match
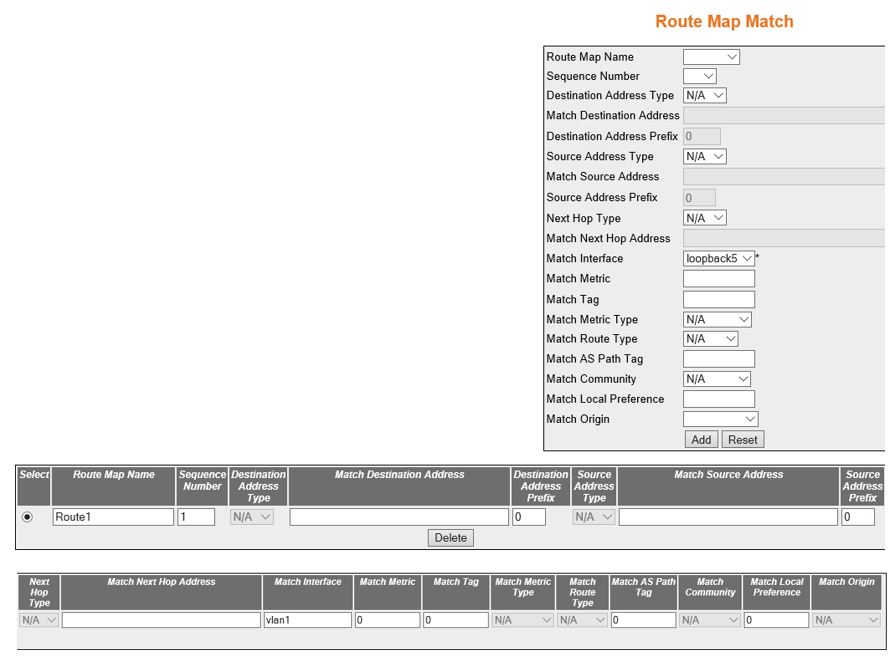
| Screen Objective |
This screen allows the user to match the Route
Map from the list of route maps. |
Note: This screen can be configured
only if Route Map is created using the Route Map Creation screen (Layer
3 Management > Route Map > Route Map Creation)
|
| Navigation |
|
| Fields |
- Route Map Name—specify
Route Map from the list of route maps.
Note: The route map is
created using the Route Map Creation screen.
- Sequence Number—select a position of
a new route map in the list of route maps already configured with
the same name. The value is a string of maximum size 10.
Note: The
sequence number is created using Route Map Creation screen.
- Destination Address Type—select the type
of destination network IP address. Options are:
- N/A—no destination
network IP address selected
- IPv4—sets the destination network IP address as IPv4
- IPV6—sets the destination network IP address as IPv6
- Match Destination Address—enter the destination
network IP address that fits the permitted range of addresses. The
destination IP address provides the range of addresses that will
get to pass the route map, when logically ANDed with the mask.
- Destination Address Prefix—enter the
prefix length of network IP address of destination network. This
value ranges from 0 to 128.
- Source Address Type—select the type of
source network IP address. Options are:
- N/A—specifies not
applicable i.e. no source network IP address is selected
- IPv4—sets the source network IP address as IPv4
- IPV6—sets the source network IP address as IPV6
- Match Source Address—enter the source
network IP address that matches the permitted range of addresses.
- Source Address Prefix—enter the prefix
length of network IP address of source network. This value ranges
from 0 to 128.
- Next Hop Type—select the type of network
IP address for next hop. Options are:
- N/A— no network IP
address type is selected for next hop
- IPv4—sets the network IP address type of next hop as IPv4
- Match Next Hop Address—specifies the
next hop router address and matches the routes having the specified
address.
- Match Interface—identifies local interface
through which the next hop can be reached, and which matches next
hop interface of the route of the specified interface.
- Match Metric—enter the metric, which
is matching the metric specified in the route map. The metric value
ranges from 1 to 167772152147483647.
|
| Fields (cont) |
- Match Tag—enter
the tag value, which is matching the tag specified in the route map.
The Match Tag ranges from 1 to 2147483647.
- Match Metric Type—select the Metric Type,
which is matching the metric type specified in the route map. Options
are:
- N/A—specifies not applicable i.e. no metric type is
selected.
- intra-area—matches OSPF routes
with metric type as OSPF inter area route metric
- Inter-area—matches the OSPF routes
with metric type as OSPF intra
area route metric.
- external-type-1—matches the OSPF routes
with metric type as external type 1 routes. If the option external
type-1 is specified as the route-type, Cost from the Router to Autonomous
Border System Router (ASBR) +
Cost from ASBR to Destination are included when route calculation
is done for a destination.
- external-type-2—matches the OSPF routes
with metric type as external type 2 routes. If the option external
type-2 is specified as the route-type, only the Cost from the Router
to ASBR is included when route
calculation is done for a destination.
- Match Route Type—select the Route Type,
which is matching the Route Type specified in the route map as per
RFC 2096. Options are:
- N/A—specifies not applicable i.e.
no match route-type is selected
- Local—matches route-type to the entries in route-map as local
routes.
- Internal—matches the route-type with the entries in route-map
as remote, where the routes are matched to the non-connected routes
(static/ routing protocol installed routes).
- Match AS Path Tag—enter the AS (Autonomous System) path tag of
the route which is matching the existing AS path
in BGP. This match applies only when redistributing routes into BGP. The AS path
tag ranges from 1 to 214748367.
- Match Community—select the BGP communities attribute to be
matched to The route in the specified community. The preference
is sent only to all routers in the local autonomous system This
match applies only when redistributing routes into BGP. Options
are:
- N/A—specifies not applicable i.e. no match community
is selected
- Internet—sets the community as Internet community. This configures
and matches the BGP community
attribute in the route as Internet where it advertises this route
to the Internet community. All routers in the network belong to
it.
|
| Fields (cont) |
- Match Community—options
are (cont):
- local-as—sets the community as local AS community.
This configures and matches the BGP community
attribute in the route as local, where it sends the route to peers
in other sub autonomous systems within the local confederation.
Does not advertise this route to an external system.
- No-advt—sets the community as no advertisement community. This
configures and matches the BGP community
attribute in the route to no-advt, where it does not advertise all
routes carrying a community attribute to other BGP peers.
- No-export—sets the community as no export community. This configures and
matches the BGP community attribute
to no-export, where all routes received carrying communities attribute
containing this value MUST NOT be advertised outside a BGP confederation boundary.
- comm-num—sets the community as community number. This sets the BGP community number. This value
ranges from 1 to 0x7fffffff (214748367).
- none—sets the community as no community. This configures the BGPcommunity attribute as none which
implies that no community is matched.
- Match Local Preference—enter preference
value for the autonomous system path. The preference is sent to
all routers in the local autonomous system only. The Local Preference
ranges from 1 to 214748367.
- Match Origin—select the option to match
BGP origin code. Options are:
- N/A—specifies not applicable
i.e. no match origin is selected.
- IGP—specifies that the route is originated through Remote Interior
Gateway Protocol.
- EGP—specifies that the route is originated through Local Exterior
Gateway Protocol.
- Incomplete—specifies that the route is originated through unknown
heritage or Remote autonomous system.
|
| Buttons |
- Add—adds and
saves new configuration.
- Reset—resets to default value for respective
fields and discards all user input.
- Apply—modifies attributes and saves the
changes.
- Delete—deletes the selected entry.
|
Route Map Set
Figure 3. Route Map Set
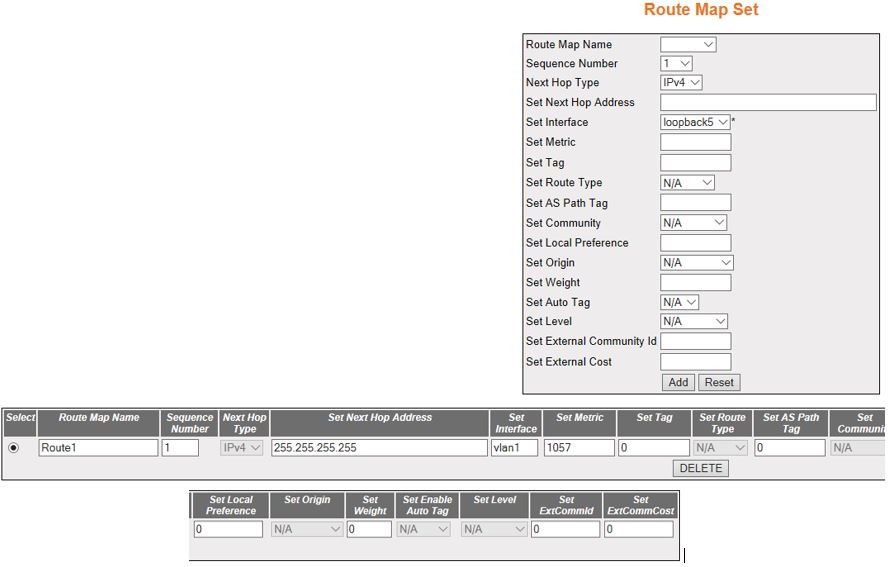
| Screen Objective |
This screen allows the user to set the Route
Map Set information. |
Note: This screen can be configured
only if Route Map is created using the Route Map Creation screen (Layer
3 Management > Route Map > Route Map Creation)
|
| Navigation |
|
| Fields |
- Select—select
the route map name for which the configuration needs to be deleted.
- Route Map Name—select the specified route-map
in the list of route-maps.
Note: The route map is created using
Route Map Creation screen.
- Sequence Number—select the position of
a new route map in the list of route maps already configured with
the same name. This value ranges from 1 to 10.
Note: The sequence
number is created using Route Map Creation screen.
- Next Hop Type—select the inet type of
address for next hop. The option is IPv4.
- Set Next Hop Address—select the inet
type of address for next hop. The option is IPv4.
- Set Interface—select the VLAN interface which is already
created and through which the next hop can be reached; sets the
interface for a route that satisfies the match conditions.
|
| Fields (cont) |
- Set Metric—enter
the primary routing metric. The semantics of the metric are determined
by the routing-protocol specified. This value ranges from 1 to 214748367
(0x7fffffff).
- Set Tag—enter the tag value of the routing
protocol. This value ranges from 1 to 214748367 (0x7fffffff).
- Set Route Type—select the route type
as per RFC 2096.The list contains:
- N/A—specifies that no
route type is selected.
- local—sets the connected routes.
- remote—sets the non-connected routes (static / routing protocol
installed routes).
- Set AS Path Tag—enter the tag of a route
into an AS path. Applies only when
redistributing routes into BGP. This value ranges from 1 to 214748367
(0x7fffffff).
- Set Community—enter the tag of a route
into an AS path. Applies only when
redistributing routes into BGP.
This value ranges from 1 to 214748367 (0x7fffffff).
- N/A—specifies
that no BGP communities attribute
is set in the route
- internet—sets the BGP community
attribute in the route as Internet where it advertises this route
to the Internet community. All routers in the network belong to
it.
- local-as—sets the BGP community
attribute in the route as local-as, where it sends this route to
peers in other sub autonomous systems within the local confederation;
it does not advertise this route to an external system.
- no-advt—sets the BGP community
attribute in the route as No-advt, which does not advertise all
routes carrying communities’ attributes to other BGP peers.
- no-export—sets the BGP community
attribute in the route as No-export, where all routes carrying a
community attribute containing this value MUST NOT be advertised
outside a BGP confederation boundary.
- none—sets the BGP community
attribute in the route as none which implies that no community is
set.
- Set Local Preference—enter a preference
value for the AS path in the route.
The preference is sent to all routers in the local AS only. This value ranges from 1
to 214748367.
- Set Origin—select the origin of the route
in BGP. The list contains:
- NA—specifies
that no origin is selected.
- igp—sets the origin of route in BGP is
remote interior gateway protocol.
- egp—sets the origin of route in BGP is
local exterior gateway protocol.
- incomplete—sets the origin of the route in BGP is incomplete. Incomplete indicates
unknown heritage
- Set Weight—enter the BGP weight for the routing table.
This value ranges from 1 to 65535(0xffff). This is set during the
process of policy routing or route redistribution.
|
| Field (cont) |
- Set Auto Tag / Set Enable
Auto Tag—select the status of computing of tag table when
distributing routes from BGP into
IGP. The default option is disable. The list contains:
- N/A—indicates
that no status is selected for computing of tag table when distributing
routes from BGP into IGP.
- 1—enables automatic computing of tag table when redistributing
routes from BGP into IGP.
- 2—disables automatic computing of tag table when redistributing
routes from BGP into IGP.
- Set Level—select the level for routes
that are advertised into the specified area of the routing domain.
This is set during the process of policy routing or route redistribution.
The list contains:
- N/A—indicates that no level of routes
is selected.
- level-1—imports routes that are advertised in a Level 1 area.
- level-2—imports routes that are advertised in a Level 2 subdomain
- level-1–2—imports routes that are advertised in a Level 1 and
Level 2.
- stub-area—imports routes that are advertised in an OSPF NSSA (Not-so-stubby
Area).
- Backbone—imports routes that are advertised into an OSPF backbone area.
- Set External Community ID / Set ExtCommID—enter
the community ID attribute, used in determining the BGP best route when extcommunity
cost is same for the routes. Route with lowest cost is preferred.
Note that this is a type of the opaque extended community. This
value ranges from 1 to 255.
- Set External Cost / Set ExtCommCost—enter
the extended cost community value that is used to determine the BGPbest route. This value ranges
from 1 to 4294967295.
|
| Buttons |
- Add—adds and
saves new configuration.
- Reset—resets to default value for respective
fields and discards all user input.
- DELETE—deletes the selected entry.
|
IP Prefix List
Figure 4. IP Prefix List
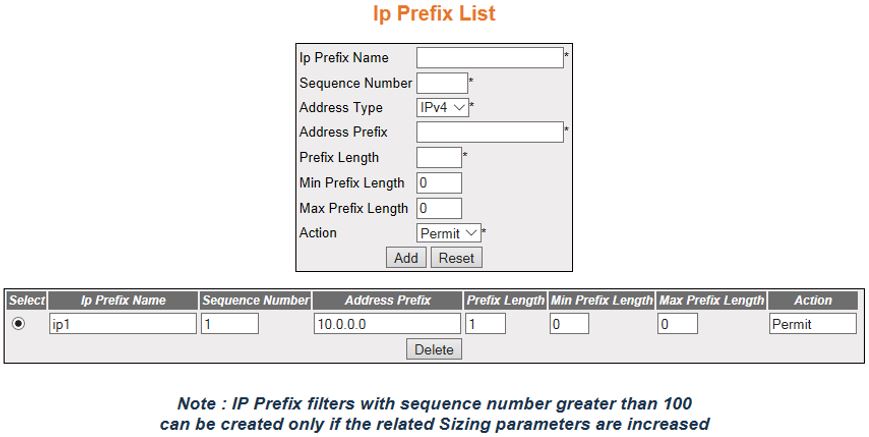
| Screen Objective |
This screen allows the user to create Route
Map which can be used in policy-based routing and route redistribution. |
| Navigation |
|
| Fields |
|
| Fields |
- Max Prefix Length—enter
the maximum prefix length to be matched. This value ranges from
1 to 32 for IPv4 address and 0 to 128 for IPv6 address.
Note: Maximum
prefix length must be greater than prefix length and greater than or
equal to min prefix length.
- Action—select the access type associated
with the sequence number in a route map. Once an instance of this
object is created, its value cannot be changed. The default option
is Permit. Options are:
- Permit—sets the access type associated
with sequence number in a route map as Permit. This permits matching
of route entry with entry rules.
- Deny—sets the access type associated with sequence number in
a route-map as Deny. This denies the route entry to match entry
rules.
|
| Buttons |
- Add—adds and
saves new configuration.
- Reset—resets to default value for respective
fields and discards all user input.
- Delete—deletes the selected entry.
|