This section will explain how to upgrade the RAPTOR firmware. This process takes approximately 5 minutes to execute.
To perform the tasks in this section, you will have already logged into the RAPTOR via the Web UI. For all upgrades, it is recommended that users back up their current running configuration prior to commencing the upgrade process.
| Initial Running Version | Destination Version | Notes |
|---|---|---|
| 1.2.23B4 | 1.3.25 | |
| 1.2.23B3 | 1.3.25 | |
| 1.3.04 | 1.3.25 | |
| 1.3.06 | 1.3.25 | |
| 1.3.xx | 1.5.13 | |
| 1.3.xx | 1.6.03 | |
| 1.5.xx | 1.6.03 | |
| 1.5.xx | 1.7.08 | |
| 1.6.xx | 1.7.08 | |
| 1.6.xx | 1.8.07 | |
| 1.7.xx | 1.8.07 | |
| 1.7.xx | 1.9.07 | |
| 1.8.xx | 1.9.07 | |
| 1.8.xx | 1.10.06 | |
| 1.9.xx | 1.10.06 | |
| 1.9.xx | 1.11.06 | |
| 1.10.xx | 1.11.06 | |
| 1.10.xx | 1.12.05 | |
| 1.11.xx | 1.12.05 | |
| 1.11.06 | 1.13.05 | |
| 1.12.05 | 1.13.05 | |
| 1.12.05 | 1.14.10 | |
| 1.13.05 | 1.14.10 | |
| 1.13.05 | 1.15.13 | |
| 1.14.10 | 1.15.13 | |
| 1.14.10 | 1.16.09 | |
| 1.15.13 | 1.16.09 | |
| 1.15.13 | 1.17.09 | |
| 1.16.09 | 1.17.09 | |
| 1.15.13 | 1.17.13 | |
| 1.16.09 | 1.17.13 | |
| 1.17.09 | 1.17.13 | |
| 1.16.09 | 1.41 / 1.18.05 | |
| 1.17.09 | 1.41 / 1.18.05 | |
| 1.17.13 | 1.41 / 1.18.05 | |
| 1.17.09 | 1.50 / 1.19.14 | |
| 1.17.13 | 1.50 / 1.19.14 | |
| 1.18.05 | 1.50 / 1.19.14 | |
| 1.18.05 | 1.60 / 1.20.11 | |
| 1.19.14 | 1.60 / 1.20.11 |
If the release that your device is running is not listed in the supported Valid Upgrade Paths table, it is recommended that the iS5Com support team is contacted for more detailed instructions.
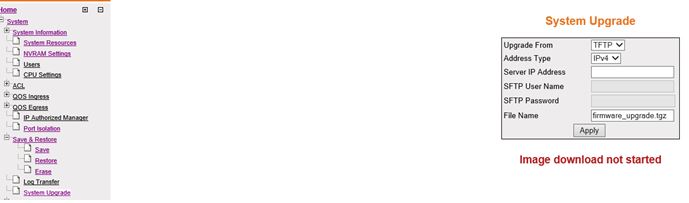
- To upgrade a Configuration from USB, navigate
to the System Upgrade page.
Go to
- Click Apply to upgrade the RAPTOR.
A timer will appear providing the elapsed time since the upgrade started. The screen will appear similar to the following.

The screen will eventually change to the following.

The RAPTOR firmware will be upgraded and reloaded automatically. After about 5 minutes, the device will be ready for users to login.
- If you are upgrading the RAPTOR from release 1.13.05 or 1.12.05 then
you may have to perform these additional steps.
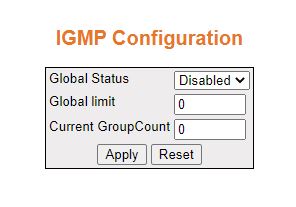
- If IGMP was configured on your RAPTOR before
the upgrade, navigate to the IGMP configuration.
On the left hand menu:
The IGMP Configuration screen will be shown.
- If your switch had PIM configured prior to the upgrade
please perform the following tasks.
On the left menu navigate to the Candidate RP Configuration page:
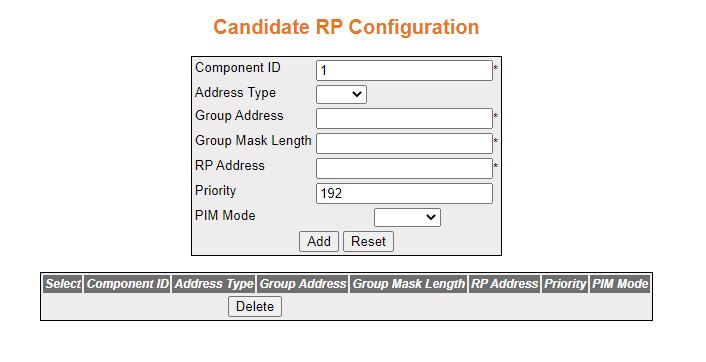
Configure the Candidate RP Configuration for all Component IDs
- Save your configuration changes.
Navigate on the left hand menu to the Save screen:
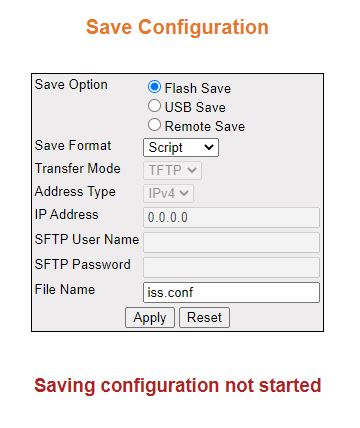
Select “Flash Save” as the save option. Then click the Apply button.
The configuration changes have now been saved.
- If IGMP was configured on your RAPTOR before
the upgrade, navigate to the IGMP configuration.