Used to configure SNMP for
network management services.
The SNMP (Simple
Network Management Protocol) is a widely deployed protocol that
is commonly used to monitor and manage network devices. SNMP works
by sending messages, called protocol data units (PDUs), to different parts of a network.
SNMP-compliant devices, called agents, store data about themselves
in Management Information Bases (MIBs)
and return this data to the SNMP requesters.
To access SNMP screens,
go to .
SNMP Agent Control Settings
By
default, the tab SNMP displays
the SNMP Agent Control Settings screen.
Figure 1. SNMP Agent Control Settings
| Screen Objective |
This screen allows the SNMP user
to configure SNMP Agent Control
Settings |
| Navigation |
|
| Fields |
- Agent—select
it to enable SNMP Agent. Enabling
this option allows the software to directly interface with the managed
modules and configure and monitor them. The default option is Enabled.
|
| Fields |
|
| Buttons |
- Apply—modifies
attributes and saves the changes.
|
AGENT
The SNMP Agent provides
an interface between a SNMP manager
and a switch. The agent processes SNMP packets
received from the manager, frames the appropriate response packets,
and sends them to the manager.
To access SNMP Agent screens,
go to .
SNMP Community
Settings
By default, the tab Community displays
the SNMP Community Settings screen.
Figure 2. SNMP Community Settings

| Screen Objective |
This screen allows the user to add a new community
configuration to the table and delete existing community configuration
from the same. |
| Navigation |
|
| Fields |
- Community Index—enter
the Index to the community table. The communities NETMAN and PUBLIC
are created.
- Community Name—enter the community name.
The communities NETMAN and PUBLIC are created.
- Security Name—enter the security name.
The default value is None.
- Context Name—enter the context name.
The default value is Null.
- Transport Tag—enter the transport tag.
The default value is Null.
- Storage Type—select the required Storage
Type for the community. The default option is NonVolatile. The list
contains:
- Volatile—sets the storage type as temporary and
erases the configuration setting during restarting of the system.
- NonVolatile—sets the storage type as permanent and saves the
configuration to the system. The saved configuration can be viewed
when restarting the system.
|
| Buttons |
- Add—adds and
saves new configuration.
- Reset—resets to default value for respective
fields and discards all user inputs.
- Apply—modifies attributes and saves the
changes.
- Delete—deletes the selected entry.
|
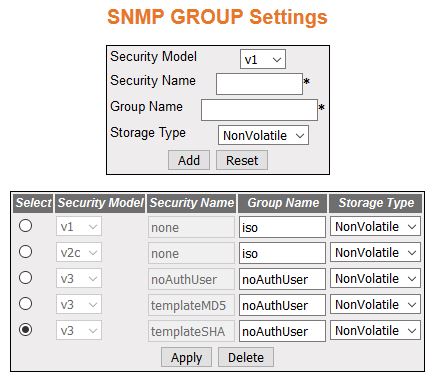
SNMP Group Settings
Figure 3. SNMP Group Settings
| Screen Objective |
This screen allows the user to configure the SNMP Group Settings. |
| Navigation |
|
| Fields |
|
| Fields (cont) |
- Security Name—enter
the security name of the group. Security names such as none, noAuthUser,
templateMD5, and templateSHA are created. This is a read- only field.
- Group Name—enter the name of the SNMP group. The SNMP groups iso and initial are
created.
- Storage Type—select the required storage
type for the group entry. The default option is NonVolatile. The
list contains:
- Volatile—sets the storage type as temporary
and erases the configuration setting during restarting of the system.
- Non-Volatile—sets the storage type as permanent and saves the
configuration to the system. The Saved configuration can be viewed
when restarting the system.
|
| Buttons |
- Add—adds and
saves new configuration.
- Reset—resets to default value for respective
fields and discards all user inputs.
- Apply—modifies attributes and saves the
changes.
- Delete—deletes the selected entry.
|
SNMP Group Access
Settings
Figure 4. SNMP Group Access Settings

| Screen Objective |
This screen allows the user to configure the SNMP Group Access Settings. |
Note: A SNMP Group
has to be created prior to a Group Access configuration. The groups
that are created in the SNMP Group
Access Settings section are displayed in the bottom form of this
screen.
|
| Navigation |
|
| Fields |
- Group Name—enter
the name of the group. The maximum size is 32.
- Security Model—select the version of
the SNMP. The versions are:
- v1—sets
the SNMP version as Version 1.
- v2c—sets the SNMP version
as Version 2.
- v3—sets the SNMP version
as Version 3.
- Security Level—select the version of
the SNMP. The list contains:
- NoAuthentication—sets
no authentication.
- Authentication—enables Message digest (MD5)
or Secure Hash Algorithm (SHA)
packet authentication.
- Private—sets both authentication and privacy.
- Read View—enter the Read View identifier
from which the user can read the data. The maximum size is 32 characters.
- Write View—enter the Write View identifier
from which the user has both read and write access. The maximum
size is 32 characters.
- Notify View—enter the Notify View identifier.
From this identifier number, the changes made will be noted and
sent to a destination through a tag. The maximum size is 32 characters.
- Storage Type—select the required storage
type for the group access entry. The list contains:
- Volatile—sets
the storage type as temporary and erases the configuration setting
during restarting of the system.
- NonVolatile—sets the storage type as permanent and saves the configuration
to the system. The Saved configuration can be viewed when restarting
the system.
|
| Buttons |
- Add—adds and
saves new configuration.
- Reset—resets to default value for respective
fields and discards all user inputs.
- Apply—modifies attributes and saves the
changes.
- Delete—deletes the selected entry.
|
SNMP View Tree Settings
Figure 5. SNMP View Tree Settings

| Screen Objective |
This screen allows the user to configure the SNMP Group Access Settings. |
Note: SNMP Group has to be
created and SNMP Access settings
need to be defined prior to the Group View Tree configuration.
|
| Navigation |
|
| Fields |
- View Name—enter
the view name for which the view details are to be configured. The
default option is ISO and restricted. The view name iso and restricted
are created.
- SubTree—enter the sub tree value for
the particular view. The default value is 1.
- Mask—enter the mask value for the particular
view. The default value is 1.
- View Type—select the view type. The default
option is Included The list contains:
- Included—allows access
to the subtree.
- Excluded—denies access to the subtree.
|
| Fields |
- Storage Type—select
the required storage type for the view tree entry. The default option
is NonVolatile. The list contains:
- Volatile—sets the storage
type as temporary and erases the configuration setting during restarting
of the system.
- NonVolatile—sets the storage type as permanent and saves the configuration
to the system. The saved configuration can be viewed when restarting
the system.
|
| Buttons |
- Add—adds and
saves new configuration.
- Reset—resets to default value for respective
fields and discards all user inputs.
- Apply—modifies attributes and saves the
changes.
- Delete—deletes the selected entry.
|
SNMP Target Address
Settings
Figure 6. SNMP Target Address Settings

| Screen Objective |
This screen allows the user to configure the SNMP Target Address Settings. |
| Navigation |
|
| Fields |
- Target Name—enter
a unique identifier of the Target. The maximum size is 32 characters.
- Target IP Address—enter a target address
to which the generated SNMP notifications
are sent.
|
| Fields (cont) |
- Port—enter the
port number through which the generated SNMP notifications
are sent to the target address.
- Transport Tag—enter the tag identifier
that is used to select the target address for the SNMP notifications.
- Param—enter SNMP parameters
to be used when generating messages to be sent to transport address.
The maximum size is 32 characters.
- Storage Type—select the required storage
type for target address entry. The list contains:
- Volatile—sets
the storage type as temporary and erases the configuration setting
during restarting of the system.
- NonVolatile—sets the storage type as permanent and saves the configuration
to the system. The Saved configuration can be viewed when restarting
the system.
|
| Buttons |
- Add—adds and
saves new configuration.
- Reset—resets to default value for respective
fields and discards all inputs.
- Apply—modifies attributes and saves the
changes.
- Delete—deletes the selected entry.
|
SNMP Target Parameter
Settings
Figure 7. SNMP Target Parameter
Settings

| Screen Objective |
This screen allows the user to configure the SNMP Target Parameter Settings. |
| Navigation |
|
| Fields |
- Parameter Name—enter
a unique identifier of the Target. The maximum size is 32.
- MP Model—select the MP model of the SNMP. The default option is v2c. The
list contains:
- v1—sets the MP model as Version 1.
- v2c—sets MP model as Version 2.
- v3—sets the MP model as Version 3.
- Security
Model—select the version of the SNMP.
The default option is v2c. The list contains:
- v1—sets the
security model as Version 1.
- v2c—sets the security model as Version 2.
- v3—sets the security model as Version 3.
- Security Name—enter the security name
used in the generation of SNMP messages.
The default option is None. The maximum size is 32.
- Security Level—select the level of security
to be used when generating SNMP messages.
The default option is NoAuthentication. The list contains:
- NoAuthentication—sets
no authentication.
- Authentication—enables Message digest (MD5)
or Secure Hash Algorithm (SHA)
packet authentication.
- Private—enables both authentication and privacy.
- Storage Type—select the required Storage
Type for target parameter entry. The list contains:
- Volatile—sets
the storage type as temporary and erases the configuration setting
during restarting of the system.
- NonVolatile—sets the storage type as permanent and saves the configuration
to the system. The saved configuration can be viewed when restarting
the system.
|
| Buttons |
- Add—adds and
saves new configuration.
- Reset—resets to default value for respective
fields and discards all user inputs.
- Apply—modifies attributes and saves the
changes.
- Delete—deletes the selected entry.
- Configure Filter Profile—click to access SNMP Filter Profile Settings screen.
|
SNMP Filter Profile
Settings
Figure 8. SNMP Filter Profile Settings

| Screen Objective |
This screen allows the user to configure the SNMP Filter Profile Settings. |
| Navigation |
Click Configure
Filter Profile |
| Fields |
- Parameter Name—select
the existing parameter name to which the filter profile setting
should be assigned.
- Filter Profile Name—enter the name for
the filter profile. This name is used when generating notifications
using the corresponding entry in the target address table. This
value is a string with maximum size of 32 characters.
- Filter Profile Storage Type—select the
required storage type for filter profile entry. The list contains:
- Volatile—sets the storage type as temporary and erases the configuration
setting during restarting of the system.
- NonVolatile—sets the storage type as permanent and saves the configuration
to the system. The Saved configuration can be viewed when restarting
the system.
|
| Buttons |
- Add—adds and
saves new configuration.
- Reset—resets to default value for respective
fields and discards all user inputs.
- Apply—modifies attributes and saves the
changes.
- Delete—deletes the selected entry.
- Configure Target Parameter—click to access SNMP Target Parameter Settings
screen.
|
User SNMP Security Settings
Figure 9. SNMP Security Settings

| Screen Objective |
This screen allows the user to configure the SNMP Security Settings. |
| Navigation |
|
| Fields |
- Engine ID—enter
the global SNMP engine id. The value is an octet string with maximum
size of 5 to 32 octets, e.g., 80:00:08:1c:04:46:53.
Note: This
value is used only for identification and not for addressing. This value
be read from iS5Comnvram.txt file or from
screen during system initialization.
- User Name—enter the user name which is
the User-based Security Model dependent security ID.
- Authentication Protocol—select the type
of authentication protocol used for authentication. The default
option is No Authentication. The list contains:
- No Authentication—sets
the authentication status as no authentication required.
- HMAC-MD5—sets the MD5 based
authentication.
- HMAC-SHA—sets the SHA based
authentication.
- Authentication Key—enter the secret authentication
key used for messages sent on behalf of this user to/from the SNMP. This value is a string with
maximum size of 40.
|
| Fields (cont) |
- Privacy Protocol—select
the type of protocol to be is used in this case. The default option
is No Privacy. The list contains:
- No Privacy—sets no privacy.
- DES—sets the privacy protocol as Data Encryption Standard (DES). This protocol provides an
algorithm to encrypt PPP encapsulated packets.
- AES—sets the privacy protocol as Advanced Encryption Standard (AES).
- Privacy Key—enter the privacy key. The
messages sent on behalf of a user to/from the SNMP, can be protected from disclosure.
This value is a string of maximum size of 32 characters.
- Storage Type—select the required storage
type for target parameter entry. The list contains:
- Volatile—sets
the storage type as temporary and erases the configuration setting
during restarting of the system.
- NonVolatile—sets the storage type as permanent and saves the configuration
to the system. The Saved configuration can be viewed when restarting
the system.
|
| Buttons |
- Add—adds and
saves new configuration.
- Reset—resets to default value for respective
fields and discards all user inputs.
- Apply—modifies attributes and saves the
changes.
- Delete—deletes the selected entry.
|
SNMP Trap Manager
Figure 10. SNMP Trap Settings
SNMP Trap Settings, key=snmp_trap_settings
| Screen Objective |
This screen allows the user to configure set
of management targets for receiving notifications. |
| Navigation |
|
| Fields |
- Notify Name—enter
a unique identifier associated with the entry. The maximum size
is 32 characters.
- Notify Tag—enter the notification tag
used to select entries in the Target Address Table. The maximum
size is 32 characters.
- Notify Type—select the notification type.
The list contains:
- Trap—allows routers to send traps to SNMP managers. Trap is a one-way
message from a network element such as a router, switch or server
to the network management system.
- Inform—allows routers / switches to send inform requests to
SNMP managers.
- Storage Type—select the required storage
type for trap settings entry. The list contains:
- Volatile—sets
the storage type as temporary and erases the configuration setting
during restarting of the system.
- NonVolatile—sets the storage type as permanent and saves the configuration
to the system. The saved configuration can be viewed when restarting
the system.
|
| Buttons |
- Add—adds and
saves new configuration.
- Reset—resets to default value for respective
fields and discards user inputs.
- Apply—modifies attributes and saves the
changes.
- Delete—deletes the selected entry.
|
SNMP Filter Settings
Figure 11. SNMP Filter Settings

| Screen Objective |
This screen allows the user to configure the
notification filters used to determine whether the management target
should receive a particular notification. The generated notification
is compared with filters associated with each management target
to determine the target to which the notification is to be sent. |
| Navigation |
|
| Fields |
- Profile Name—enter
the filter profile name that should be used during generating notifications.
This value is a string with maximum size of 32 characters.
Note: The
profile name should have been already created through SNMP Filter Profile Settings screen.
- SubTree—enter the MIB subtree that is
combined with corresponding instance of mask to define a family
of subtrees which are included in or excluded from the filter profile.
- Mask—enter the bit mask that is combined
with MIB subtree to define a family of subtrees. This is an octet
string with a maximum size of 16 characters.
- Filter Type—select the type of filter
to be applied for the filter entry. The default option is included.
The list contains:
- Included—indicates that the family of
filter subtrees is defined using MIB subtree and a bit mask is included
in a filter.
- Excluded—indicates that the family of filter subtrees is defined
using MIB subtree and a bit mask is excluded from a filter.
|
| Fields (cont) |
- Storage Type—select
the required Storage Type for trap settings entry. The list contains:
- Volatile—sets the storage type as temporary and erases the configuration setting
during restarting of the system.
- NonVolatile—sets the storage type as permanent and saves the
configuration to the system. The Saved configuration can be viewed
when restarting the system.
|
| Buttons |
- Add—adds and
saves new configuration.
- Reset—resets to default value for respective
fields and discards user inputs.
- Apply—modifies attributes and saves the
changes.
- Delete—deletes the selected entry.
|
SNMP Proxy Settings
Figure 12. SNMP Proxy Settings

| Screen Objective |
This screen allows the user to configure the
configure translation parameters for forwarding SNMP messages. |
| Navigation |
|
| Fields |
- Proxy Name—enter
the unique proxy name that identifies an entry in the proxy table.This
value is a string with maximum size of 32 characters.
|
| Fields (cont) |
- Proxy Type—select
the type of message to be forwarded using the translation parameters
defined by proxy entry. The list contains:
- Read—read messages
are forwarded to get the request from the manager.
- Write—write messages are forwarded to set configurations.
- Inform—notification messages are forwarded to the agent.
- Trap—SNMP trap messages are forwarded to the agent
- Proxy Context Engine ID—enter the context
engine ID of the agent with whom the manager communicates through
the proxy.
- Proxy Context Name—enter a unique context
name for an SNMP sub agent. This name
is used to identify the corresponding sub agent when more than one
sub agent exists.
- Proxy TargetParamIn—enter
the SNMP version that the manager
sends as request to the proxy.
- Proxy Single TargetOut—enter the SNMP version that the proxy uses
to communicate with the agent.
- Proxy Multiple TargetOut—enter the SNMP version that the proxy uses
to communicate with multiple agent.
- Proxy Storage Type—select the required
Storage Type for the proxy. The list contains:
- Volatile—the
configuration is lost after the switch is rebooted, even if the entry
is saved.
- Non-Volatile—the configuration is available even after the switch
is rebooted if the entry is saved
|
| Buttons |
- Add—adds and
saves new configuration.
- Reset—resets to default value for respective
fields and discards all user inputs.
- Apply—modifies attributes and saves the
changes.
- Delete—deletes the selected entry.
|
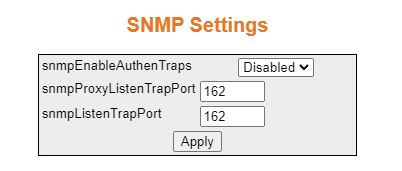
SNMP Settings
Figure 13. SNMP Settings
| Screen Objective |
This screen allows the user to configure SNMP scalar parameters which are independent
of each other. |
| Navigation |
|
| Fields |
- snmpEnableAuthenTrap—select
the status of the authentication failure traps. The list contains:
- Enabled—enables generation of authentication failure traps.
- Disabled—disables generation of authentication failure traps
- snmpProxyListenTrapPort—enter the port
number on which proxy listens for trap and inform messages from
the agent. The default value is 162.
- snmpListenTrapPort—enter the port number
on which SNMP trap messages are sent
to the manager. The default value is 162.
|
| Buttons |
- Apply—modifies
attributes and saves the changes.
|