This section will document how to upgrade the firmware on the RAPTOR. This process takes approximately 5 minutes to execute.
To perform the tasks in this section, you will have already logged into the RAPTOR via an SSH connection or through the console port. For all upgrades it is recommended that user’s backup their current running configuration prior to commencing the upgrade process.
Valid Upgrade Paths
| Initial Running Version | Destination Version | Notes |
|---|---|---|
| 1.2.23B4 | 1.3.25 | |
| 1.2.23B3 | 1.3.25 | |
| 1.3.04 | 1.3.25 | |
| 1.3.06 | 1.3.25 | |
| 1.3.xx | 1.5.13 | |
| 1.3.xx | 1.6.03 | |
| 1.5.xx | 1.6.03 | |
| 1.5.xx | 1.7.08 | |
| 1.6.xx | 1.7.08 | |
| 1.6.xx | 1.8.07 | |
| 1.7.xx | 1.8.07 | |
| 1.7.xx | 1.9.07 | |
| 1.8.xx | 1.9.07 | |
| 1.8.xx | 1.10.06 | |
| 1.9.xx | 1.10.06 | |
| 1.9.xx | 1.11.06 | |
| 1.10.xx | 1.11.06 | |
| 1.10.xx | 1.12.05 | |
| 1.11.xx | 1.12.05 | |
| 1.11.06 | 1.13.05 | |
| 1.12.05 | 1.13.05 | |
| 1.12.05 | 1.14.10 | |
| 1.13.05 | 1.14.10 | |
| 1.13.05 | 1.15.13 | |
| 1.14.10 | 1.15.13 |
Downgrades to an earlier release are not supported.
If the release that your device is running is not listed in the Supported Upgrade Paths table, it is recommended that the iS5Com support team is contacted for more detailed instructions.
- Optionally, you may choose to upgrade the RAPTOR firmware.
The upgrade process will begin, text similar the following will begin scrolling on the terminal:

- Allow the RAPTOR to
reboot, the U-Boot menu will appear. Do not interact with it.
Do not interact with this menu and the boot process will proceed automatically.
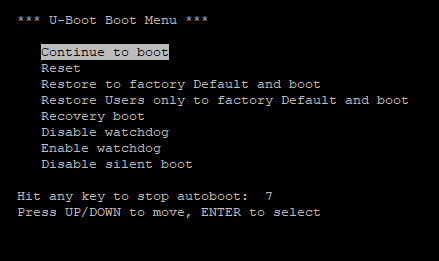
The clock will expire and the upgrade will proceed without user intervention.
The upgrade process will terminate at a user prompt.
The RAPTOR has been upgraded and users may now login to it.