Describes how to configure the Dynamic Host Configuration
Protocol Server on the switch.
DHCP (Dynamic Host
Configuration Protocol) is used for assigning IP addresses to workstations
in a wide variety of devices, such as ISDN routers,
firewalls, etc. Besides obtaining IP address, other configuration parameters
for a workstation can also be configured in a DHCP server. DHCP clients can retrieve these parameters
along with the IP address.
DHCP is based on the client-server
architecture. DHCP servers are
configured with an IP address and several other configuration parameters. DHCP clients, typically workstations,
obtain this IP address at start-up. The clients obtain the address
for a time period termed as a “lease” period. DHCP clients renew the address
by sending a request for the IP address before the lease expires
DHCP uses UDP as its transport protocol and
a UDP port for communication. DHCP relay agents connect servers
present on one LAN with the clients present on another.
DHCP server is responsible
for dynamically assigning unique IP address and other configuration
parameters, such as gateway, to the interfaces of a DHCP client. The IP address is
leased to the interface only for a particular time period as stated
in the DHCP lease. The interface
should renew the DHCP lease once
it expires. The DHCP server contains
a pool of IP addresses from which an address is assigned to the
interface.
To access DHCP screens, go to .
DHCP Basic Settings
By
default, the tab Basic Settings displays
the DHCP Basic Settings screen.
Figure 1. DHCP Basic Settings
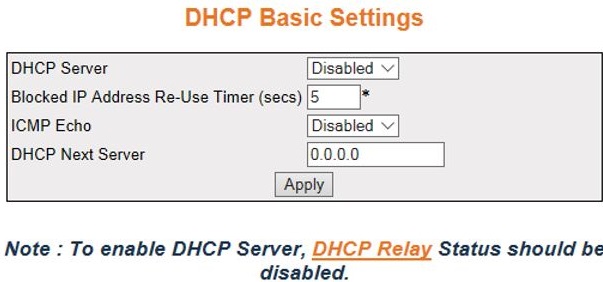
| Screen Objective |
This screen allows the user to configure the
basic DHCP settings. |
Note: To enable DHCP Server, DHCP Relay Status should be disabled.
|
| Navigation |
|
| Fields |
- DHCP Server—select
the DHCP server status in the
router. The default option is Disabled. The list contains:
- Enabled—enables
the DHCP server in the router
and starts serving the server with the IP addresses. It opens the
UDP socket and starts listening for DHCP discover
messages from clients.
- Disabled—disables the DHCP server
in the router.
Note: The DHCP server
can be set as Enabled, only if the DHCP Relay
is set as Disabled using Layer 3 Management > DHCP Relay > Basic
Settings > DHCP Relay Basic Settings screen.
- Blocked IP Address Re-Use Timer (secs)—enter
the reuse timeout value used by DHCP in
seconds. It denotes the amount of time the DHCP server entity
waits for a DHCP REQUEST from a client, before reusing the offer
(i.e. the blocked IP address). An value zero disables this timer.
This value ranges from 1 to 120 seconds. The default value is 5
seconds.
- ICMP Echo—select the status of ICMP (Internet Control Message
Protocol) Echo feature for the DHCP server.
This object controls the server to probe for the IP address before
allocating the IP address to a client through the ICMP echo message. The default
option is Disabled. The list contains:
|
| Fields (cont) |
- ICMP Echo—the
list contains (cont.):
- Enabled—enables the ICMP Echo feature. Before allocating
an IP Address to client, the server broadcasts ICMP Echo Request (Ping Packet)
to check whether any other machine/host is using this IP. If there
is no response received, the server allocates the IP to the client.
- Disabled—disables the ICMP Echo
feature. The ICMP Echo Request packet
mechanism is not used. The IP is directly allocated to the client.
- DHCP Next Server—select the IP address
of the boot server (TFTP server) from
which the initial boot file is to be loaded in a DHCP client. This boot server acts
as a secondary server. The default address is 0.0.0.0 (No boot server
is defined). The DHCP server
is used as a boot server.
|
| Buttons |
- Apply—modifies
attributes and saves the changes.
|
DHCP Pool Settings
Figure 2. DHCP Pool Settings

| Screen Objective |
This screen allows the user to configure a DHCP address pool. A DHCP address pool is used by the
servers to allocate IP addresses to clients. |
| Navigation |
|
| Fields |
- Select—click
to choose a Pool ID for which the configuration needs to be modified
or deleted.
- Pool ID—enter the Pool ID. This is an
unique index for any subnet pool. This value ranges from 1 to 2147483647.
- Pool Name—enter the pool name to identify
the subnet pool. This is a string of maximum size 64.
- Subnet Pool—enter the subnet of the IP
address in the pool.
- Network Mask—enter the Network Mask.
It denotes the client’s subnet mask of the IP address in the pool.
- Start IP Address—enter the first IP address
in the address pool that is used for dynamic allocation by the DHCP server. This specifies the
lower limit for IP address in an address pool.
Note: Start IP
Address should have same network of the subnet pools.
- End IP Address—enter the last IP address
in the address pool that is used for dynamic allocation by the DHCP server. This specifies the
upper limit for IP address in an address pool.
Note: Start IP
Address should have same network of the subnet pools.
- Lease Time (Secs)—enter the time interval
for which the IP address is valid. This specifies the amount of
time that the client can use the IP address assigned by the server
and is specific to each IP address pool. Every IP address allocated
from a pool will be returned to the pool if the client does not
renew it. This value ranges from 60 to 2147483647 seconds. The default value
is 3600.
- Utilization threshold / Threshold—enter
the DHCP pool utilization threshold value
in percentage. This specifies the upper limit for the address pool
utilization, after which a notification will be sent to SNMP Manager. This value ranges
from 0 to 100 in percentage. The default value is 75.
- Status—select the status of the entry.
It denotes the status of address pool configuration and allocation
of IP address. Options are.
- UP—configures the address pool
successfully for allocating IP address.
- Down—does not configure address pool for allocating IP address
|
| Buttons |
- Create—adds
and saves new configuration.
- Reset—resets to default value for respective
fields and discards all user input.
- Apply—modifies attributes and saves the
changes.
- Delete—deletes the selected entry.
|
DHCP Pool Option
Settings
Figure 3. DHCP Pool Option Settings

| Screen Objective |
This screen allows the user to configure a DHCP address pool. A DHCP address pool is used by the
servers to allocate IP addresses to clients. |
| Navigation |
|
| Fields |
- Select—click
to choose a Pool Name for the configuration to be modified/deleted.
- Pool Name—select a Pool Name from the
list of Address Pools created in the system for which DHCP Pool Options a configuration
needs to be applied.
Note: This field lists the pool names created
in DHCP Pool settings screen
- Option / Option Name—select the DHCP pool option to be set to the
selected pool name. The default option is NetMask (IP Format).
Note: Refer
Appendix A for the items in the list and their description
- Option Code—displays the corresponding
DHCP Option Code for the DHCP option selected
in the field Option. The Option Code represents a specific DHCP option used in a DHCP OFFER
message in response to a DHCP DISCOVER message. The default is 1
- the default Netmask (IP Format).
Note: Refer Appendix A for
the items in the list and their description.
This field is
configurable if the option is selected as “Enter Option Code Manually”
- Option Value—enter the value to be set
for the DHCP option selected
in the field Option. This value can be an ASCII string, hexadecimal
string or unicast IP address based on the DHCP pool
option.
- Option Value 2—enter the value to be
set for the DHCP option selected
in the field Option. This value can be an ASCII string, hexadecimal
string or unicast IP address based on the DHCP pool
option.
Note: This field is enabled only when the Option/Option
Name is set as Network Time Protocol server (IP Format), SIP Server IP Format, and SIP Server Domain name.
|
| Buttons |
- ADD—adds and
saves new configuration.
- Reset—resets to default value for respective
fields and discards all user input.
- Apply—modifies attributes and saves the
changes.
- Delete—deletes the selected entry.
|
DHCP Server IP Exclude Settings
Figure 4. DHCP Server
IP Exclude Settings
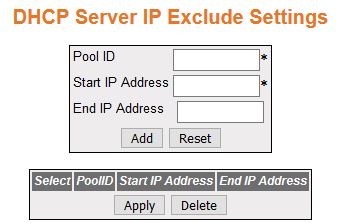
| Screen Objective |
This screen allows the user to configure a DHCP address pool. A DHCP address pool is used by the
servers to allocate IP addresses to clients. |
| Navigation |
|
| Fields |
- Select—click
to choose a Pool ID for the configuration to be reapplied.
- Pool ID—click to select Pool ID for which
the configuration needs to be re-applied.
Note: Pool ID should
be created using the DHCP Pool
Settings screen prior to configuring the exclude list.
- Start IP address—enter the start IP address
for the Exclude List. This address denotes the first IP address
of a range of IP addresses which needs to be excluded from the created
subnet pool.
Note: This IP address should be:
- lower
than the end IP address of the Exclude List, and
- In the same network of the subnet pool start IP address.
- End IP address—enter the end IP address
for the Exclude List. This address denotes the first IP address
of a range of IP addresses which needs to be excluded from the created
subnet pool.
Note: This IP address should be:
- higher
than the end IP address of the Exclude List, and
- In the same network of the subnet pool start IP address.
|
| Buttons |
- Add—adds and
saves new configuration.
- Reset—resets to default value for respective
fields and discards all user input.
- Apply—modifies attributes and saves the
changes.
- Delete—deletes the selected entry.
|
DHCP Host IP Settings
Figure 5. DHCP Host IP Settings
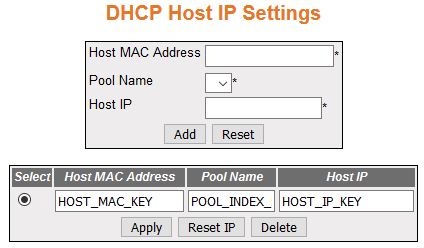
| Screen Objective |
This screen allows the user to configure the
Host IP Settings. |
| Navigation |
|
| Fields |
- Select—click
to choose a Pool ID for the configuration to be reapplied.
- Host MAC Address—enter the unicast MAC
address for configuring the DHCP host.
- Pool Name—select a Pool Name from the
list of Address Pools created in the system for which DHCP host
IP related configuration needs to be applied.
Note: This field
lists the pool names created in DHCP Pool
settings (Layer 3 Management > DHCP Server > Pool Settings) screen.
- Host IP—enter the IP address for configuring
of the DHCP host.
|
| Buttons |
- Add—adds and
saves new configuration.
- Reset—resets to default value for respective
fields and discards all user input.
- Apply—modifies attributes and saves the
changes.
- Delete—deletes the selected entry.
|
DHCP Host Options Settings
Figure 6. DHCP Host Options
Settings

| Screen Objective |
This screen allows the user to configure the
Host IP Options. |
| Navigation |
|
| Fields |
- Select—click
to select Host MAC address for which the configuration is re-applied.
- Host MAC Address—enter Unicast MAC address
for configuring the DHCP host.
- Pool Name—select a Pool Name from the
list for which DHCP host IP related configuration
needs to be applied.
Note: Refer to Appendix A for the items in
the list and their descriptions.
- Option Code—displays the corresponding DHCP option code for the DHCP option selected in the field
option. The option code represents that represents a specific DHCP option used in a DHCP OFFER
message in response to a DHCP DISCOVER message. The default is 1
(the code for the default option—Netmask (IP Format).
Note: Refer
to Appendix A for details about option code and its corresponding DHCP option.This field is configurable
if the option is selected as “Enter Option Code Manually”.
- Option Value—enter the value to be set
for the DHCP option selected
in the field option. This value can be an ASCII string, hexadecimal
string, or unicast IP address based on the DHCP pool option.
- Option Value 2—enter the value to be
set for the specified DHCP option.
This value can be an ASCII string, hexadecimal string, or unicast
IP address based on the DHCP pool
option.
Note: This field is enabled only when the Option/Option Name
is set as Network Time Protocol server (IP Format), SIP Server IP
Format and SIP Server Domain name.
|
| Buttons |
- Add—adds and
saves new configuration.
- Reset—resets to default value for respective
fields and discards all user input.
- Apply—modifies attributes and saves the
changes.
- Delete—deletes the selected entry.
|
DHCP Bootfile Configuration
Figure 7. DHCP Bootfile Configuration

| Screen Objective |
This screen allows the user to configure the
name of the initial boot file to be loaded in a DHCP client. |
| Navigation |
|
| Fields |
- Enter the bootfile name—enter
the name of the initial boot file to be loaded in a DHCP client. This value is a string
of maximum size 64. The boot file contains the boot image that is
used as the operating system for the DHCP client.
Note: Only
characters and numbers are accepted in the bootfile name string.
|
| Buttons |
- Apply—modifies
attributes and saves the changes.
- Reset—resets to default value for respective
fields and discards all user input.
|