MODBUS TCP Server Mode Configuration

This section lists the CLI configuration steps for TCP Server Configuration for MODBUS connection.

The MODBUS is a request-response protocol. A client (can request the MODBUS server to perform an action and the server will respond with that action.

The client:

The MODBUS server:

Configure VLAN 1.

Type the following:

  • Enter the Global Configuration Mode.
Phoenix_Contact# configure terminal
  • Enter the Interface Configuration Mode.
Phoenix_Contact(config)# interface vlan 1
  • Configure VLAN 1.
Phoenix_Contact(config-if)# no shutdown
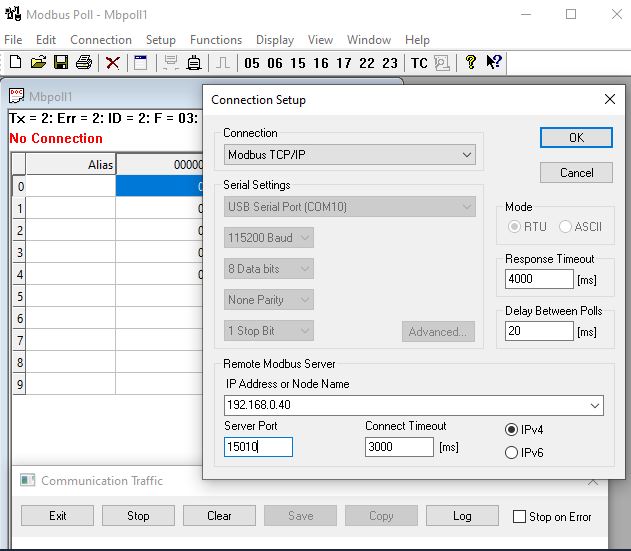
Phoenix_Contact(config-if)# ip address 192.168.0.40 255.255.255.0
Phoenix_Contact(config-if)# end
Phoenix_Contact# show ip interface

  • Enter the Global Configuration Mode.
Phoenix_Contact# configure terminal
  • Enter the Interface Configuration Mode for 0/9.
Phoenix_Contact(config)# interface serial 0/9
  • For example, configure the baud rate.
Phoenix_Contact(config-serial-if)# baud-rate 115200
Phoenix_Contact(config-serial-if)# no shutdown
Phoenix_Contact(config-serial-if)# end

  • Enter the Global Configuration Mode.
Phoenix_Contact# configure terminal
  • Enter the Interface Configuration Mode for 0/9.
Phoenix_Contact(config)# interface serial 0/10
  • For example, configure the baud rate.
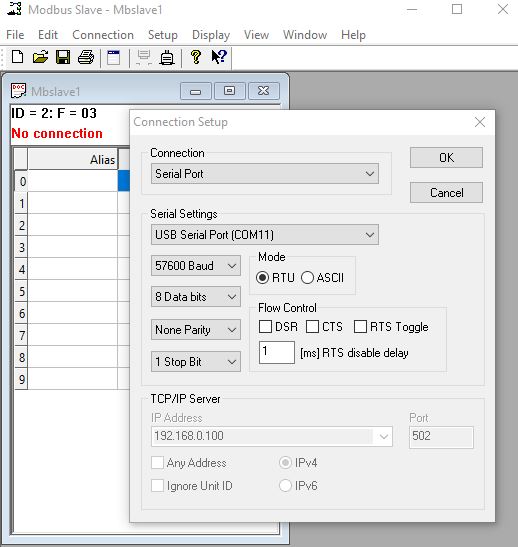
Phoenix_Contact(config-serial-if)# baud-rate 57600
Phoenix_Contact(config-serial-if)# no shutdown
Phoenix_Contact(config-serial-if)# end

Listening to the Master

  1. Start a server.

    Type the following:

    • Enter the Global Configuration Mode.
    Phoenix_Contact# configure terminal
    • Configure profile PROF_10_MOD_CLIENT.
    Phoenix_Contact(config)# serial connection-type modbus profile PROF_MOD_SERVER
    Phoenix_Contact(modbus-PROF_MOD_SERVER)# role server
    Phoenix_Contact(modbus-PROF_MOD_SERVER-server)# local server port modbus
    Phoenix_Contact(modbus-PROF_MOD_SERVER-server)# add slave-id 1,12,13,14,15,16,17,18,19,20 interface serial 0/9
    Phoenix_Contact(modbus-PROF_MOD_SERVER-server)# connection-map 
    Phoenix_Contact((modbus-PROF_MOD_SERVER-server)# end
  2. Run one of the commands "show serial profile all" or "show serial profile name YOUR_PROFILE_NAME" or "show serial profile interface serial 0/YOUR_INT_NUM" to verify the connection status (it should be not connected).

    Type the following:

    Phoenix_Contact# show serial profile interface all
    Profile : PROF_MOD_SERVER
    Protocol : Modbus
    Role                    : TCP Server
    Serial interface        : 9
    Slaves ID             : 1 12 13 14 15 16 17 18 19 20
    Serial byte counter   : 0
    Response time (msec)  : 2000
    Turnaround delay(msec): 0
    Hold time(msec)       : 0
    Rx-to-Tx delay(msec)  : 0
    Local Server Port       : 502
    Max clients alowed      : 64
    Clients number          : 0
    KeepAlive interval (sec): 240
    Max pending messages    : 16
    Current pending messages: 0
    Send exceptions         : YES
    RXed from slave msg    : 0
    TXed to slave msg : 0
    RXed from master msg    : 0
    TXed to master msg : 0
    Exceptions created      : 0
  3. Verify default parameters.

Connecting Master to the Server

  1. Open Master / Client Application. Go to the Read/Write Definition screen and checkRead/Write Disabled. Click OK.

    Type the following:

    Figure 1. Connecting Master to the Server


  2. Go to the Connection.

    Type the following:

    Figure 2. Connection


  3. In Connection Setup dialog box, go to Connection field and set connection type and Server’s IP and Port. Click OK.

    Type the following:

    Figure 3. Connection Setup


  4. Run one of the commands "show serial profile all" or "show serial profile name YOUR_PROFILE_NAME" or "show serial profile interface serial 0/YOUR_INT_NUM" to verify the connection status (it should be not connected).

    Type the following:

    Phoenix_Contact# show serial profile interface all
    Profile : PROF_MOD_SERVER
    Protocol : Modbus
    Role                    : TCP Server
    Serial interface        : 9
    Slaves ID             : 1 12 13 14 15 16 17 18 19 20
    Serial byte counter   : 0
    Response time (msec)  : 2000
    Turnaround delay(msec): 0
    Hold time(msec)       : 0
    Rx-to-Tx delay(msec)  : 0
    Local Server Port       : 502
    Max clients alowed      : 64
    Clients number          : 1
    Client  1 IP            : 192.168.0.100
    Client  1 port          : 59418
    Client  1 byte counter  : 0
    KeepAlive interval (sec): 240
    Max pending messages    : 16
    Current pending messages: 0
    Send exceptions         : YES
    RXed from slave msg    : 0
    TXed to slave msg : 0
    RXed from master msg    : 0
    TXed to master msg : 0
    Exceptions created      : 0
  5. Verify that response time in the Master is bigger then in the Server.

Sending Request from Master to not Configured Slave

  1. In the Master, click Display menu and clickCommunication Traffic. Click OK.

    Type the following:

    Figure 4. Display Menu


  2. Click 03 Read Holding Registers from Slave ID 1. Use Slave ID that is not configured.

    Type the following:

    Figure 5. 03 Read Holding Registers


  3. Verify receiving exception.
  4. Run one of the commands "show serial profile all" or "show serial profile name YOUR_PROFILE_NAME" or "show serial profile interface serial 0/YOUR_INT_NUM" to verify the track of sent exceptions.

    Type the following:

    Phoenix_Contact# show serial profile interface all
    Profile : PROF_MOD_SERVER
    Protocol : Modbus
    Role                    : TCP Server
    Serial interface        : 9
    Slaves ID             : 1 12 13 14 15 16 17 18 19 20
    Serial byte counter   : 0
    Response time (msec)  : 2000
    Turnaround delay(msec): 0
    Hold time(msec)       : 0
    Rx-to-Tx delay(msec)  : 0
    Local Server Port       : 502
    Max clients alowed      : 64
    Clients number          : 1
    Client  1 IP            : 192.168.0.100
    Client  1 port          : 59418
    Client  1 byte counter  : 12
    KeepAlive interval (sec): 240
    Max pending messages    : 16
    Current pending messages: 0
    Send exceptions         : YES
    RXed from slave msg    : 0
    TXed to slave msg : 1
    RXed from master msg    : 1
    TXed to master msg : 1
    Exceptions created      : 1

Configuring Send Exceptions

  1. Disable exceptions to be send to the Master.

    Type the following:

    • Enter the Global Configuration Mode.
    Phoenix_Contact# configure terminal
    • Configure profile PROF_10_MOD_CLIENT.
    Phoenix_Contact(config)# serial connection-type modbus profile PROF_MOD_SERVER
    Phoenix_Contact(modbus-PROF_MOD_SERVER)# role server
    Phoenix_Contact(modbus-PROF_MOD_SERVER-server)# no connection-map
    Phoenix_Contact(modbus-PROF_MOD_SERVER-server)# transmit-exception disable
    Phoenix_Contact(modbus-PROF_MOD_SERVER-server)# connection-map 
    Phoenix_Contact((modbus-PROF_MOD_SERVER-server)# end
  2. Run one of the commands "show serial profile all" or "show serial profile name YOUR_PROFILE_NAME" or "show serial profile interface serial 0/YOUR_INT_NUM" to verify the connection status (it should be not connected).

    Type the following:

    Phoenix_Contact# show serial profile interface all
    Profile : PROF_MOD_SERVER
    Protocol : Modbus
    Role                    : TCP Server
    Serial interface        : 9
    Slaves ID             : 1 12 13 14 15 16 17 18 19 20
    Serial byte counter   : 0
    Response time (msec)  : 2000
    Turnaround delay(msec): 0
    Hold time(msec)       : 0
    Rx-to-Tx delay(msec)  : 0
    Local Server Port       : 502
    Max clients alowed      : 64
    Clients number          : 1
    KeepAlive interval (sec): 240
    Max pending messages    : 16
    Current pending messages: 0
    Send exceptions         : YES
    RXed from slave msg    : 0
    TXed to slave msg : 0
    RXed from master msg    : 0
    TXed to master msg : 0
    Exceptions created      : 1
  3. Verify the exception from the server is not sent to the Master, but was created.
  4. Verify Master announce “Response Time Out” exception.
  5. Enable exception to be send to the Master.

    Type the following:

    • Enter the Global Configuration Mode.
    Phoenix_Contact# configure terminal
    • Configure profile PROF_10_MOD_CLIENT.
    Phoenix_Contact(config)# serial connection-type modbus profile PROF_MOD_SERVER
    Phoenix_Contact(modbus-PROF_MOD_SERVER)# role server
    Phoenix_Contact(modbus-PROF_MOD_SERVER-server)# no connection-map
    Phoenix_Contact(modbus-PROF_MOD_SERVER-server)# transmit-exception enable
    Phoenix_Contact(modbus-PROF_MOD_SERVER-server)# connection-map 
    Phoenix_Contact((modbus-PROF_MOD_SERVER-server)# end
  6. Run one of the commands "show serial profile all" or "show serial profile name YOUR_PROFILE_NAME" or "show serial profile interface serial 0/YOUR_INT_NUM" to verify the track of sent exception.

    Type the following:

    Phoenix_Contact# show serial profile interface all
    Profile : PROF_MOD_SERVER
    Protocol : Modbus
    Role                    : TCP Server
    Serial interface        : 9
    Slaves ID             : 1 12 13 14 15 16 17 18 19 20
    Serial byte counter   : 0
    Response time (msec)  : 2000
    Turnaround delay(msec): 0
    Hold time(msec)       : 0
    Rx-to-Tx delay(msec)  : 0
    Local Server Port       : 502
    Max clients alowed      : 64
    Clients number          : 1
    KeepAlive interval (sec): 240
    Max pending messages    : 16
    Current pending messages: 0
    Send exceptions         : YES
    RXed from slave msg    : 0
    TXed to slave msg : 0
    RXed from master msg    : 0
    TXed to master msg : 0
    Exceptions created      : 1

Sending Request from Master to Slave, Which Is Offline

  1. In the Master, click Display menu and clickCommunication Traffic. Click OK.

    Type the following:

    Figure 6. Display Menu


  2. Click 03 Read Holding Registers from Slave ID 1.

    Perform the following:

    Figure 7. 03 Read Holding Registers


  3. Verify receiving exception.
  4. Run one of the commands "show serial profile all" or "show serial profile name YOUR_PROFILE_NAME" or "show serial profile interface serial 0/YOUR_INT_NUM" to verify the track of sent exceptions.

    Type the following:

    Phoenix_Contact# show serial profile interface all
    Profile : PROF_MOD_SERVER
    Protocol : Modbus
    Role                    : TCP Server
    Serial interface        : 9
    Slaves ID             : 1 12 13 14 15 16 17 18 19 20
    Serial byte counter   : 0
    Response time (msec)  : 2000
    Turnaround delay(msec): 0
    Hold time(msec)       : 0
    Rx-to-Tx delay(msec)  : 0
    Local Server Port       : 502
    Max clients alowed      : 64
    Clients number          : 1
    Client  1 IP            : 192.168.0.100
    Client  1 port          : 59418
    Client  1 byte counter  : 12
    KeepAlive interval (sec): 240
    Max pending messages    : 16
    Current pending messages: 0
    Send exceptions         : YES
    RXed from slave msg    : 0
    TXed to slave msg : 1
    RXed from master msg    : 1
    TXed to master msg : 1
    Exceptions created      : 1

Sending Request from Master to Slave

  1. In the Master, open Connection Setup screen, apply serial line related configuration, and connect by clickingCommunication. Click OK.

    Type the following:

    Figure 8. Connection Setup


  2. Apply wanted values to the Slave’s hold registers by double clicking on single register.

    Type the following:

    Figure 9. Edit Registers


  3. In the Master, click Display menu and clickCommunication Traffic. Click OK.
  4. Read the holding registers from the slave.

    Perform the following.

    Figure 10. Read holding registers from the slave


  5. Run one of the commands "show serial profile all" or "show serial profile name YOUR_PROFILE_NAME" or "show serial profile interface serial 0/YOUR_INT_NUM" to verify the track of sent exceptions.

    Type the following:

    Phoenix_Contact# show serial profile interface all
    Profile : PROF_MOD_SERVER
    Protocol : Modbus
    Role                    : TCP Server
    Serial interface        : 9
    Slaves ID             : 1 12 13 14 15 16 17 18 19 20
    Serial byte counter   : 0
    Response time (msec)  : 2000
    Turnaround delay(msec): 0
    Hold time(msec)       : 0
    Rx-to-Tx delay(msec)  : 0
    Local Server Port       : 502
    Max clients alowed      : 64
    Clients number          : 1
    Client  1 IP            : 192.168.0.100
    Client  1 port          : 61121
    Client  1 byte counter  : 48
    KeepAlive interval (sec): 240
    Max pending messages    : 16
    Current pending messages: 0
    Send exceptions         : YES
    RXed from slave msg    : 2
    TXed to slave msg : 2
    RXed from master msg    : 2
    TXed to master msg : 2
    Exceptions created      : 1

Using not Native Modbus Port

  1. Start a server.

    Type the following:

    • Enter the Global Configuration Mode.
    Phoenix_Contact# configure terminal
    • Configure profile PROF_10_MOD_CLIENT.
    Phoenix_Contact(config)# serial connection-type modbus profile PROF_MOD_SERVER
    Phoenix_Contact(modbus-PROF_MOD_SERVER)# role server
    Phoenix_Contact(modbus-PROF_MOD_SERVER-server)# no connection-map
    Phoenix_Contact(modbus-PROF_MOD_SERVER-server)# local server port modbus
    Phoenix_Contact(modbus-PROF_MOD_SERVER-server)# connection-map 
    Phoenix_Contact((modbus-PROF_MOD_SERVER-server)# end
  2. Run one of the commands "show serial profile all" or "show serial profile name YOUR_PROFILE_NAME" or "show serial profile interface serial 0/YOUR_INT_NUM" to verify the connection status (it should be not connected).

    Type the following:

    Phoenix_Contact# show serial profile interface all
    Profile : PROF_MOD_SERVER
    Protocol : Modbus
    Role                    : TCP Server
    Serial interface        : 9
    Slaves ID             : 1 12 13 14 15 16 17 18 19 20
    Serial byte counter   : 0
    Response time (msec)  : 2000
    Turnaround delay(msec): 0
    Hold time(msec)       : 0
    Rx-to-Tx delay(msec)  : 0
    Local Server Port       : 15010
    Max clients alowed      : 64
    Clients number          : 0
    KeepAlive interval (sec): 240
    Max pending messages    : 16
    Current pending messages: 0
    Send exceptions         : YES
    RXed from slave msg    : 0
    TXed to slave msg : 0
    RXed from master msg    : 0
    TXed to master msg : 0
    Exceptions created      : 0
  3. Disconnect the Master, open Connection, change the server’s port number, and reconnect with master using new server's port.

    Perform the following.

    Figure 11. Connection Setup


Connecting Second Master

  1. Perform the same procedure as in section “Connecting Master to the Server”.
  2. Run one of the commands "show serial profile all" or "show serial profile name YOUR_PROFILE_NAME" or "show serial profile interface serial 0/YOUR_INT_NUM" to verify it. The client number should be 2 and the IPs and ports of both clients should be shown.

    Type the following:

    Phoenix_Contact# show serial profile interface all
    Profile : PROF_MOD_SERVER
    Protocol : Modbus
    Role                    : TCP Server
    Serial interface        : 9
    Slaves ID             : 1 12 13 14 15 16 17 18 19 20
    Serial byte counter   : 0
    Response time (msec)  : 2000
    Turnaround delay(msec): 0
    Hold time(msec)       : 0
    Rx-to-Tx delay(msec)  : 0
    Local Server Port       : 502
    Max clients alowed      : 64
    Clients number          : 2
    Client  1 IP            : 192.168.0.100
    Client  1 port          : 55470
    Client  1 byte counter  : 0
    Client  2 IP            : 192.168.0.100
    Client  2 port          : 55481
    Client  2 byte counter  : 564
    KeepAlive interval (sec): 240
    Max pending messages    : 16
    Current pending messages: 0
    Send exceptions         : YES
    RXed from slave msg    : 47
    TXed to slave msg : 47
    RXed from master msg    : 47
    TXed to master msg : 47
    Exceptions created      : 0

Sending keep-alive to Both Masters

  1. Run one of the commands "show serial profile all" or "show serial profile name YOUR_PROFILE_NAME" or "show serial profile interface serial 0/YOUR_INT_NUM" to verify that keepalive time is 240 seconds (default value). The keep alive messages should be sent every 240 seconds to both clients.

    Type the following:

    Phoenix_Contact# show serial profile interface all
    Profile : PROF_MOD_SERVER
    Protocol : Modbus
    Role                    : TCP Server
    Serial interface        : 9
    Slaves ID             : 1 12 13 14 15 16 17 18 19 20
    Serial byte counter   : 0
    Response time (msec)  : 2000
    Turnaround delay(msec): 0
    Hold time(msec)       : 0
    Rx-to-Tx delay(msec)  : 0
    Local Server Port       : 502
    Max clients alowed      : 64
    Clients number          : 2
    Client  1 IP            : 192.168.0.100
    Client  1 port          : 55470
    Client  1 byte counter  : 0
    Client  2 IP            : 192.168.0.100
    Client  2 port          : 55481
    Client  2 byte counter  : 564
    KeepAlive interval (sec): 240
    Max pending messages    : 16
    Current pending messages: 0
    Send exceptions         : YES
    RXed from slave msg    : 47
    TXed to slave msg : 47
    RXed from master msg    : 47
    TXed to master msg : 47
    Exceptions created      : 0


    86339 - 86099 = 240

  2. Change keep-alive time to 60 seconds (minimum).

    Type the following:

    • Enter the Global Configuration Mode.
    Phoenix_Contact# configure terminal
    • Configure profile PROF_10_MOD_CLIENT.
    Phoenix_Contact(config)# serial connection-type modbus profile PROF_MOD_SERVER
    Phoenix_Contact(modbus-PROF_MOD_SERVER)# role server
    Phoenix_Contact(modbus-PROF_MOD_SERVER-server)# no connection-map
    Phoenix_Contact(modbus-PROF_MOD_SERVER-server)# keep-alive timeout 60
    Phoenix_Contact(modbus-PROF_MOD_SERVER-server)# connection-map 
    Phoenix_Contact((modbus-PROF_MOD_SERVER-server)# end
  3. Reconnect Masters.
  4. Run one of the commands "show serial profile all" or "show serial profile name YOUR_PROFILE_NAME" or "show serial profile interface serial 0/YOUR_INT_NUM" to verify that keepalive time is 240 seconds (default value). The keep alive messages should be sent every 240 seconds to both clients.

    Type the following:

    Phoenix_Contact# show serial profile interface all
    Profile : PROF_MOD_SERVER
    Protocol : Modbus
    Role                    : TCP Server
    Serial interface        : 9
    Slaves ID             : 1 12 13 14 15 16 17 18 19 20
    Serial byte counter   : 0
    Response time (msec)  : 2000
    Turnaround delay(msec): 0
    Hold time(msec)       : 0
    Rx-to-Tx delay(msec)  : 0
    Local Server Port       : 502
    Max clients alowed      : 64
    Clients number          : 2
    Client  1 IP            : 192.168.0.100
    Client  1 port          : 55470
    Client  1 byte counter  : 0
    Client  2 IP            : 192.168.0.100
    Client  2 port          : 55481
    Client  2 byte counter  : 564
    KeepAlive interval (sec): 60
    Max pending messages    : 16
    Current pending messages: 0
    Send exceptions         : YES
    RXed from slave msg    : 47
    TXed to slave msg : 47
    RXed from master msg    : 47
    TXed to master msg : 47
    Exceptions created      : 0

Setting max client connections to 2

  1. Change maximum client connections to 2.

    Type the following:

    • Enter the Global Configuration Mode.
    Phoenix_Contact# configure terminal
    • Configure profile PROF_10_MOD_CLIENT.
    Phoenix_Contact(config)# serial connection-type modbus profile PROF_MOD_SERVER
    Phoenix_Contact(modbus-PROF_MOD_SERVER)# role server
    Phoenix_Contact(modbus-PROF_MOD_SERVER-server)# no connection-map
    Phoenix_Contact(modbus-PROF_MOD_SERVER-server)# max client connections 2
    Phoenix_Contact(modbus-PROF_MOD_SERVER-server)# connection-map 
    Phoenix_Contact((modbus-PROF_MOD_SERVER-server)# end
  2. Run one of the commands "show serial profile all" or "show serial profile name YOUR_PROFILE_NAME" or "show serial profile interface serial 0/YOUR_INT_NUM" to verify the maximum clients number.

    Type the following:

    Phoenix_Contact# show serial profile interface all
    Profile : PROF_MOD_SERVER
    Protocol : Modbus
    Role                    : TCP Server
    Serial interface        : 9
    Slaves ID             : 1 12 13 14 15 16 17 18 19 20
    Serial byte counter   : 0
    Response time (msec)  : 2000
    Turnaround delay(msec): 0
    Hold time(msec)       : 0
    Rx-to-Tx delay(msec)  : 0
    Local Server Port       : 15010
    Max clients alowed      : 2
    Clients number          : 0
    Client  1 IP            : 192.168.0.100
    Client  1 port          : 55470
    Client  1 byte counter  : 0
    Client  2 IP            : 192.168.0.100
    Client  2 port          : 55481
    Client  2 byte counter  : 564
    KeepAlive interval (sec): 60
    Max pending messages    : 16
    Current pending messages: 0
    Send exceptions         : YES
    RXed from slave msg    : 0
    TXed to slave msg : 0
    RXed from master msg    : 0
    TXed to master msg : 0
    Exceptions created      : 0
  3. Connect both Masters to the Server. No problems should be observed.
  4. Run one of the commands "show serial profile all" or "show serial profile name YOUR_PROFILE_NAME" or "show serial profile interface serial 0/YOUR_INT_NUM" to verify the number of connected clients.

    Type the following:

    Phoenix_Contact# show serial profile interface all
    Profile : PROF_MOD_SERVER
    Protocol : Modbus
    Role                    : TCP Server
    Serial interface        : 9
    Slaves ID             : 1 12 13 14 15 16 17 18 19 20
    Serial byte counter   : 0
    Response time (msec)  : 2000
    Turnaround delay(msec): 0
    Hold time(msec)       : 0
    Rx-to-Tx delay(msec)  : 0
    Local Server Port       : 15010
    Max clients alowed      : 2
    Clients number          : 2
    Client  1 IP            : 192.168.0.100
    Client  1 port          : 57904
    Client  1 byte counter  : 0
    Client  2 IP            : 192.168.0.100
    Client  2 port          : 57908
    Client  2 byte counter  : 0
    KeepAlive interval (sec): 60
    Max pending messages    : 16
    Current pending messages: 0
    Send exceptions         : YES
    RXed from slave msg    : 0
    TXed to slave msg : 0
    RXed from master msg    : 0
    TXed to master msg : 0
    Exceptions created      : 0

Connecting with Third Master

  1. Try to connect with the third Master. There is no visible error in the third Master application that can be seen, but the connection should be refused.
  2. Run one of the commands "show serial profile all" or "show serial profile name YOUR_PROFILE_NAME" or "show serial profile interface serial 0/YOUR_INT_NUM" to verify the number of connected clients. It should be 2 as the maximum clients number.

    Type the following:

    Phoenix_Contact# show serial profile interface all
    Profile : PROF_MOD_SERVER
    Protocol : Modbus
    Role                    : TCP Server
    Serial interface        : 9
    Slaves ID             : 1 12 13 14 15 16 17 18 19 20
    Serial byte counter   : 0
    Response time (msec)  : 2000
    Turnaround delay(msec): 0
    Hold time(msec)       : 0
    Rx-to-Tx delay(msec)  : 0
    Local Server Port       : 15010
    Max clients alowed      : 2
    Clients number          : 2
    Client  1 IP            : 192.168.0.100
    Client  1 port          : 55470
    Client  1 byte counter  : 0
    Client  2 IP            : 192.168.0.100
    Client  2 port          : 55481
    Client  2 byte counter  : 564
    KeepAlive interval (sec): 60
    Max pending messages    : 16
    Current pending messages: 0
    Send exceptions         : YES
    RXed from slave msg    : 0
    TXed to slave msg : 0
    RXed from master msg    : 0
    TXed to master msg : 0
    Exceptions created      : 0

Adding Slaves to Second Serial Interface

  1. Add a second serial interface to the profile by adding slaves to it.

    Type the following:

    • Enter the Global Configuration Mode.
    Phoenix_Contact# configure terminal
    • Configure profile PROF_10_MOD_CLIENT.
    Phoenix_Contact(config)# serial connection-type modbus profile PROF_MOD_SERVER
    Phoenix_Contact(modbus-PROF_MOD_SERVER)# role server
    Phoenix_Contact(modbus-PROF_MOD_SERVER-server)# no connection-map
    Phoenix_Contact(modbus-PROF_MOD_SERVER-server)# add slave-id 2,21,22,23,24,25 interface serial 0/10
    Phoenix_Contact(modbus-PROF_MOD_SERVER-server)# connection-map 
    Phoenix_Contact((modbus-PROF_MOD_SERVER-server)# end
  2. Run one of the commands "show serial profile all" or "show serial profile name YOUR_PROFILE_NAME" or "show serial profile interface serial 0/YOUR_INT_NUM" to verify the number of connected clients. It should be 2 as the maximum clients number.

    Type the following:

    Phoenix_Contact# show serial profile interface all
    Profile : PROF_MOD_SERVER
    Protocol : Modbus
    Role                    : TCP Server
    Serial interface        : 9
    Slaves ID             : 1 12 13 14 15 16 17 18 19 20
    Serial byte counter   : 0
    Response time (msec)  : 2000
    Turnaround delay(msec): 0
    Hold time(msec)       : 0
    Rx-to-Tx delay(msec)  : 0
    Serial interface        : 10
    Slaves ID             : 2 21 22 23 24 25
    Serial byte counter   : 0
    Response time (msec)  : 2000
    Turnaround delay(msec): 0
    Hold time(msec)       : 0
    Rx-to-Tx delay(msec)  : 0
    Local Server Port       : 502
    Max clients alowed      : 2
    KeepAlive interval (sec): 60
    Max pending messages    : 16
    Current pending messages: 0
    Send exceptions         : YES
    RXed from slave msg    : 0
    TXed to slave msg : 0
    RXed from master msg    : 0
    TXed to master msg : 0
    Exceptions created      : 0

Connecting Second Slave To First Serial Interface

  1. Connect Slave Id 12 to the first interface (0/9). Go to New menu.

    Perform the following.

    Figure 12. New Menu


  2. Click new Slave and click Setup->Slave Definition or press F8.
  3. Set Slave ID to 12.

    Perform the following

    Figure 13. Slave Definition


  4. Click OK.

Connecting Third Slave To Second Serial Interface

  1. Open new Modbus Slave Application.
  2. Click Setup->Slave Definition or press F8.
  3. Set Slave ID to 2.Click OK.
  4. Click Connection->Connect or press F3.
  5. Set parameters for serial interface: connection type: Serial Port; new serial interface number; and new baud rate: 57600.

    See below.

    Figure 14. Connecting Third Slave To Second Serial Interface


  6. Click OK. A new serial connection is established.

Connecting Forth Slave To Second Serial Interface

  1. Open new Modbus Slave Application.
  2. Click File->New or press Ctrl+N.
  3. Click new Slave->Tab Setup->Slave Definition or press F8.
  4. Set Slave ID to 21. Click OK.
  5. Click Display->Communication.
  6. Set any values to slaves 2 and 21.

    See below.

    Figure 15. Connecting Forth Slave To Second Serial Interface


Sending Request from First Master to Slave 12

  1. In the Read/Write definition (F8), select Slave ID 1.
  2. Click Read/Write once.
  3. Verify the Holding registers in the Master updated with the Slave’s ID 1 information.
  4. Verify that Communication Traffic windows show the transaction in the Master and in the Slave application.
  5. Run one of the commands "show serial profile all" or "show serial profile name YOUR_PROFILE_NAME" or "show serial profile interface serial 0/YOUR_INT_NUM" to verify that counters are incremented.

    Type the following:

    Phoenix_Contact# show serial profile interface all
    Profile : PROF_MOD_SERVER
    Protocol : Modbus
    Role                    : TCP Server
    Serial interface        : 9
    Slaves ID             : 1 12 13 14 15 16 17 18 19 20
    Serial byte counter   : 0
    Response time (msec)  : 2000
    Turnaround delay(msec): 0
    Hold time(msec)       : 0
    Rx-to-Tx delay(msec)  : 0
    Serial interface        : 10
    Slaves ID             : 2 21 22 23 24 25
    Serial byte counter   : 0
    Response time (msec)  : 2000
    Turnaround delay(msec): 0
    Hold time(msec)       : 0
    Rx-to-Tx delay(msec)  : 0
    Local Server Port       : 502
    Max clients alowed      : 2
    Clients number          : 2
    Client  1 IP            : 192.168.0.100
    Client  1 port          : 60441
    Client  1 byte counter  : 12
    Client  2 IP            : 192.168.0.100
    Client  2 port          : 60448
    Client  2 byte counter  : 0
    KeepAlive interval (sec): 60
    Max pending messages    : 16
    Current pending messages: 0
    Send exceptions         : YES
    RXed from slave msg     : 1
    TXed to slave msg       : 1
    RXed from master msg    : 1
    TXed to master msg      : 1
    Exceptions created      : 0

Sending Request from the First Master to the Slave 12

Repeat steps from “Sending Request from the First Master to the Slave 1”, but use Slave ID 12.

Sending Request from the First Master to the Slave 2

Repeat steps from “Sending Request from the First Master to the Slave 1”, but use Slave ID 2.

Sending Request from the First Master to the Slave 21

Repeat steps from “Sending Request from the First Master to the Slave 1”, but use Slave ID 21.

Sending Request from the Second Master to the Slave 1

Repeat steps from “Sending Request from the First Master to the Slave 1”, but use Second Master Application and Slave ID 1.

Sending Request from the Second Master to the Slave 12

Repeat steps from “Sending Request from the First Master to the Slave 1”, but use Second Master Application and Slave ID 12.

Sending Request from the Second Master to the Slave 2

Repeat steps from “Sending Request from the First Master to the Slave 1”, but use Second Master Application and Slave ID 2.

Sending Request from the Second Master to the Slave 21

Repeat steps from “Sending Request from the First Master to the Slave 1”, but use Second Master Application and Slave ID 21.

Deleting Forth Slave from the Second Serial Interface

  1. Delete Slave ID 21 from the profile.

    Type the following:

    • Enter the Global Configuration Mode.
    Phoenix_Contact# configure terminal
    • Configure profile PROF_10_MOD_CLIENT.
    Phoenix_Contact(config)# serial connection-type modbus profile PROF_MOD_SERVER
    Phoenix_Contact(modbus-PROF_MOD_SERVER)# role server
    Phoenix_Contact(modbus-PROF_MOD_SERVER-server)# no connection-map
    Phoenix_Contact(modbus-PROF_MOD_SERVER-server)# remove slave-id 21 interface serial 0/10
    Phoenix_Contact(modbus-PROF_MOD_SERVER-server)# connection-map 
    Phoenix_Contact((modbus-PROF_MOD_SERVER-server)# end
  2. Run one of the commands "show serial profile all" or "show serial profile name YOUR_PROFILE_NAME" or "show serial profile interface serial 0/YOUR_INT_NUM" to verify that slave was removed.

    Type the following:

    Phoenix_Contact# show serial profile interface all
    Profile : PROF_MOD_SERVER
    Protocol : Modbus
    Role                    : TCP Server
    Serial interface        : 9
    Slaves ID             : 1 12 13 14 15 16 17 18 19 20
    Serial byte counter   : 0
    Response time (msec)  : 2000
    Turnaround delay(msec): 0
    Hold time(msec)       : 0
    Rx-to-Tx delay(msec)  : 0
    Serial interface        : 10
    Slaves ID             : 2 22 23 24 25
    Serial byte counter   : 0
    Response time (msec)  : 2000
    Turnaround delay(msec): 0
    Hold time(msec)       : 0
    Rx-to-Tx delay(msec)  : 0
    Local Server Port       : 502
    Max clients alowed      : 2
    Clients number          : 0
    KeepAlive interval (sec): 60
    Max pending messages    : 16
    Current pending messages: 0
    Send exceptions         : YES
    RXed from slave msg     : 0
    TXed to slave msg       : 0
    RXed from master msg    : 0
    TXed to master msg      : 0
    Exceptions created      : 0
  3. Reconnect the Masters and send request from one of the Masters to Slave ID 21.
  4. Verify that Master received exception “Gateway path unavailable“.
  5. Run one of the commands "show serial profile all" or "show serial profile name YOUR_PROFILE_NAME" or "show serial profile interface serial 0/YOUR_INT_NUM" to verify that exception was created.

    Type the following:

    Phoenix_Contact# show serial profile interface all
    Profile : PROF_MOD_SERVER
    Protocol : Modbus
    Role                    : TCP Server
    Serial interface        : 9
    Slaves ID             : 1 12 13 14 15 16 17 18 19 20
    Serial byte counter   : 0
    Response time (msec)  : 2000
    Turnaround delay(msec): 0
    Hold time(msec)       : 0
    Rx-to-Tx delay(msec)  : 0
    Serial interface        : 10
    Slaves ID             : 2 22 23 24 25
    Serial byte counter   : 0
    Response time (msec)  : 2000
    Turnaround delay(msec): 0
    Hold time(msec)       : 0
    Rx-to-Tx delay(msec)  : 0
    Local Server Port       : 502
    Max clients alowed      : 2
    Clients number          : 1
    Client  1 IP            : 192.168.0.100
    Client  1 port          : 62798
    Client  1 byte counter  : 12
    KeepAlive interval (sec): 60
    Max pending messages    : 16
    Current pending messages: 0
    Send exceptions         : YES
    RXed from slave msg     : 0
    TXed to slave msg       : 0
    RXed from master msg    : 1
    TXed to master msg      : 1
    Exceptions created      : 1

Changing Response Time for Second Serial Interface

  1. Change the response time for the interface 0/10.

    Type the following:

    • Enter the Global Configuration Mode.
    Phoenix_Contact# configure terminal
    • Configure profile PROF_10_MOD_CLIENT.
    Phoenix_Contact(config)# serial connection-type modbus profile PROF_MOD_SERVER
    Phoenix_Contact(modbus-PROF_MOD_SERVER)# role server
    Phoenix_Contact(modbus-PROF_MOD_SERVER-server)# no connection-map
    Phoenix_Contact(modbus-PROF_MOD_SERVER-server)# response-timeout 50 interface serial 0/10
    Phoenix_Contact(modbus-PROF_MOD_SERVER-server)# connection-map 
    Phoenix_Contact((modbus-PROF_MOD_SERVER-server)# end
  2. Run one of the commands "show serial profile all" or "show serial profile name YOUR_PROFILE_NAME" or "show serial profile interface serial 0/YOUR_INT_NUM" to verify that slave was removed.

    Type the following:

    Phoenix_Contact# show serial profile interface all
    Profile : PROF_MOD_SERVER
    Protocol : Modbus
    Role                    : TCP Server
    Serial interface        : 9
    Slaves ID             : 1 12 13 14 15 16 17 18 19 20
    Serial byte counter   : 0
    Response time (msec)  : 2000
    Turnaround delay(msec): 0
    Hold time(msec)       : 0
    Rx-to-Tx delay(msec)  : 0
    Serial interface        : 10
    Slaves ID             : 2 22 23 24 25
    Serial byte counter   : 0
    Response time (msec)  : 50
    Turnaround delay(msec): 0
    Hold time(msec)       : 0
    Rx-to-Tx delay(msec)  : 0
    Local Server Port       : 502
    Max clients alowed      : 2
    Clients number          : 0
    KeepAlive interval (sec): 60
    Max pending messages    : 16
    Current pending messages: 0
    Send exceptions         : YES
    RXed from slave msg     : 0
    TXed to slave msg       : 0
    RXed from master msg    : 0
    TXed to master msg      : 0
    Exceptions created      : 0

Sending Two Requests from both Masters to Same Slave with no Delay Between

  1. Read Holding registers from the same slave with no delay between readings.
  2. Verify that the reading is done, Masters' holding registers were updated and messages are seen in the communication screens of the masters and the slave.

Configuring RX-to-TX Delay

  1. Set rx-to-tx delay to 1000 for interface 0/10.

    Type the following:

    • Enter the Global Configuration Mode.
    Phoenix_Contact# configure terminal
    • Configure profile PROF_10_MOD_CLIENT.
    Phoenix_Contact(config)# serial connection-type modbus profile PROF_MOD_SERVER
    Phoenix_Contact(modbus-PROF_MOD_SERVER)# role server
    Phoenix_Contact(modbus-PROF_MOD_SERVER-server)# no connection-map
    Phoenix_Contact(modbus-PROF_MOD_SERVER-server)# end

    Phoenix_Contact# configure terminal
    Phoenix_Contact(config)# interface serial 0/10
    Phoenix_Contact(config-serial-if)# rx-to-tx delay 1000 
    Phoenix_Contact(config-serial-if)# no shutdown
    Phoenix_Contact(config-serial-if)# end 

    Phoenix_Contact# configure terminal
    Phoenix_Contact(config)# serial connection-type modbus profile PROF_MOD_SERVER
    Phoenix_Contact(modbus-PROF_MOD_SERVER)# role server
    Phoenix_Contact(modbus-PROF_MOD_SERVER-server)# connection-map
    Phoenix_Contact(modbus-PROF_MOD_SERVER-server)# end
  2. Connect with the Masters and Slaves.
  3. Run one of the commands "show serial profile all" or "show serial profile name YOUR_PROFILE_NAME" or "show serial profile interface serial 0/YOUR_INT_NUM" to verify that rx-to-tx delay is 1000 msec for interface 0/10.

    Type the following:

    Phoenix_Contact# show serial profile interface all
    Profile : PROF_MOD_SERVER
    Protocol : Modbus
    Role                    : TCP Server
    Serial interface        : 9
    Slaves ID             : 1 12 13 14 15 16 17 18 19 20
    Serial byte counter   : 0
    Response time (msec)  : 2000
    Turnaround delay(msec): 0
    Hold time(msec)       : 0
    Rx-to-Tx delay(msec)  : 0
    Serial interface        : 10
    Slaves ID             : 2 22 23 24 25
    Serial byte counter   : 0
    Response time (msec)  : 50
    Turnaround delay(msec): 0
    Hold time(msec)       : 0
    Rx-to-Tx delay(msec)  : 1000
    Local Server Port       : 502
    Max clients alowed      : 2
    Clients number          : 2
    Client  1 IP            : 192.168.0.100
    Client  1 port          : 56436
    Client  1 byte counter  : 0
    Client  2 IP            : 192.168.0.100
    Client  2 port          : 56437
    Client  2 byte counter  : 0
    KeepAlive interval (sec): 60
    Max pending messages    : 16
    Current pending messages: 0
    Send exceptions         : YES
    RXed from slave msg     : 0
    TXed to slave msg       : 0
    RXed from master msg    : 0
    TXed to master msg      : 0
    Exceptions created      : 0
  4. Read holding registers twice with no delay between reads.
  5. Verify that the first response in the Master’s Communication Traffic screen appears immediately, and the second response only after 1 second approximately.

Changing Maximum Pending Messages to 0

  1. Change the number of maximum pending messages to 0.

    Type the following:

    • Enter the Global Configuration Mode.
    Phoenix_Contact# configure terminal
    • Configure profile PROF_10_MOD_CLIENT.
    Phoenix_Contact(config)# serial connection-type modbus profile PROF_MOD_SERVER
    Phoenix_Contact(modbus-PROF_MOD_SERVER)# role server
    Phoenix_Contact(modbus-PROF_MOD_SERVER-server)# no connection-map
    Phoenix_Contact(modbus-PROF_MOD_SERVER-server)# max pending messages 0
    Phoenix_Contact(modbus-PROF_MOD_SERVER-server)# connection-map
    Phoenix_Contact(modbus-PROF_MOD_SERVER-server)# end
  2. Run one of the commands "show serial profile all" or "show serial profile name YOUR_PROFILE_NAME" or "show serial profile interface serial 0/YOUR_INT_NUM" to verify the number of the maximum pending messages was changed.

    Type the following:

    Phoenix_Contact# show serial profile interface 
    Profile : PROF_MOD_SERVER
    Protocol : Modbus
    Role                    : TCP Server
    Serial interface        : 9
    Slaves ID             : 1 12 13 14 15 16 17 18 19 20
    Serial byte counter   : 0
    Response time (msec)  : 2000
    Turnaround delay(msec): 0
    Hold time(msec)       : 0
    Rx-to-Tx delay(msec)  : 0
    Serial interface        : 10
    Slaves ID             : 2 22 23 24 25
    Serial byte counter   : 0
    Response time (msec)  : 50
    Turnaround delay(msec): 0
    Hold time(msec)       : 0
    Rx-to-Tx delay(msec)  : 1000
    Local Server Port       : 502
    Max clients alowed      : 2
    Clients number          : 2
    Client  1 IP            : 192.168.0.100
    Client  1 port          : 56436
    Client  1 byte counter  : 0
    Client  2 IP            : 192.168.0.100
    Client  2 port          : 56437
    Client  2 byte counter  : 0
    KeepAlive interval (sec): 60
    Max pending messages    : 0
    Current pending messages: 0
    Send exceptions         : YES
    RXed from slave msg     : 0
    TXed to slave msg       : 0
    RXed from master msg    : 0
    TXed to master msg      : 0
    Exceptions created      : 0

Sending Two Requests from One Master to Same Slave with no Delay Between

  1. Read holding registers twice with no delay between reads.
  2. Verify that the first response in the Master’s Communication Traffic screen appears immediately, and the second request responds with exception ”Slave device busy”.
  3. Change the maximum pending messages to 10.

    Type the following:

    • Enter the Global Configuration Mode.
    Phoenix_Contact# configure terminal
    • Configure profile PROF_10_MOD_CLIENT.
    Phoenix_Contact(config)# serial connection-type modbus profile PROF_MOD_SERVER
    Phoenix_Contact(modbus-PROF_MOD_SERVER)# role server
    Phoenix_Contact(modbus-PROF_MOD_SERVER-server)# no connection-map
    Phoenix_Contact(modbus-PROF_MOD_SERVER-server)# max pending messages 10
    Phoenix_Contact(modbus-PROF_MOD_SERVER-server)# connection-map
    Phoenix_Contact(modbus-PROF_MOD_SERVER-server)# end
  4. Run one of the commands "show serial profile all" or "show serial profile name YOUR_PROFILE_NAME" or "show serial profile interface serial 0/YOUR_INT_NUM" to verify the number of the maximum pending messages was changed to 10.

    Type the following:

    Phoenix_Contact# show serial profile interface 
    Profile : PROF_MOD_SERVER
    Protocol : Modbus
    Role                    : TCP Server
    Serial interface        : 9
    Slaves ID             : 1 12 13 14 15 16 17 18 19 20
    Serial byte counter   : 0
    Response time (msec)  : 2000
    Turnaround delay(msec): 0
    Hold time(msec)       : 0
    Rx-to-Tx delay(msec)  : 0
    Serial interface        : 10
    Slaves ID             : 2 22 23 24 25
    Serial byte counter   : 0
    Response time (msec)  : 50
    Turnaround delay(msec): 0
    Hold time(msec)       : 0
    Rx-to-Tx delay(msec)  : 1000
    Local Server Port       : 502
    Max clients alowed      : 2
    Clients number          : 2
    Client  1 IP            : 192.168.0.100
    Client  1 port          : 56436
    Client  1 byte counter  : 0
    Client  2 IP            : 192.168.0.100
    Client  2 port          : 56437
    Client  2 byte counter  : 0
    KeepAlive interval (sec): 60
    Max pending messages    : 10
    Current pending messages: 0
    Send exceptions         : YES
    RXed from slave msg     : 0
    TXed to slave msg       : 0
    RXed from master msg    : 0
    TXed to master msg      : 0
    Exceptions created      : 0
  5. Set rx-to-tx delay to 0 for interface 0/10.

    Type the following:

    • Enter the Global Configuration Mode.
    Phoenix_Contact# configure terminal
    • Configure profile PROF_10_MOD_CLIENT.
    Phoenix_Contact(config)# serial connection-type modbus profile PROF_MOD_SERVER
    Phoenix_Contact(modbus-PROF_MOD_SERVER)# role server
    Phoenix_Contact(modbus-PROF_MOD_SERVER-server)# no connection-map
    Phoenix_Contact(modbus-PROF_MOD_SERVER-server)# end

    Phoenix_Contact# configure terminal
    Phoenix_Contact(config)# interface 
    Phoenix_Contact(config-serial-if)# rx-to-tx delay 0 
    Phoenix_Contact(config-serial-if)# no shutdown
    Phoenix_Contact(config-serial-if)# end 

    Phoenix_Contact# configure terminal
    Phoenix_Contact(config)# serial connection-type modbus profile PROF_MOD_SERVER
    Phoenix_Contact(modbus-PROF_MOD_SERVER)# role server
    Phoenix_Contact(modbus-PROF_MOD_SERVER-server)# no connection-map
    Phoenix_Contact(modbus-PROF_MOD_SERVER-server)# end

Sending Broadcast Write Request from First Master

  1. Write to the Slave ID 0 by changing function number to 16 in the Read/Write Definition screen and clicking Read/Write Once.
  2. Verify that all slaves were written with data.
  3. Verify that “Timeout Exception” was reported on master.
  4. Run one of the commands "show serial profile all" or "show serial profile name YOUR_PROFILE_NAME" or "show serial profile interface serial 0/YOUR_INT_NUM" to verify the messages that were sent and received.

    Type the following:

    Phoenix_Contact# show serial profile interface 
    Profile : PROF_MOD_SERVER
    Protocol : Modbus
    Role                    : TCP Server
    Serial interface        : 9
    Slaves ID             : 1 12 13 14 15 16 17 18 19 20
    Serial byte counter   : 0
    Response time (msec)  : 2000
    Turnaround delay(msec): 0
    Hold time(msec)       : 0
    Rx-to-Tx delay(msec)  : 0
    Serial interface        : 10
    Slaves ID             : 2 22 23 24 25
    Serial byte counter   : 0
    Response time (msec)  : 50
    Turnaround delay(msec): 0
    Hold time(msec)       : 0
    Rx-to-Tx delay(msec)  : 0
    Local Server Port       : 502
    Max clients alowed      : 2
    Clients number          : 2
    Client  1 IP            : 192.168.0.100
    Client  1 port          : 57886
    Client  1 byte counter  : 0
    Client  2 IP            : 192.168.0.100
    Client  2 port          : 57889
    Client  2 byte counter  : 33
    KeepAlive interval (sec): 240
    Max pending messages    : 10
    Current pending messages: 0
    Send exceptions         : YES
    RXed from slave msg     : 0
    TXed to slave msg       : 2
    RXed from master msg    : 1
    TXed to master msg      : 0
    Exceptions created      : 0

Sending Broadcast Read Request from the First Master

  1. Read from the Slave ID 0 by changing function number to 3 in the Read/Write Definition screen and clicking Read/Write Once.
  2. Verify that “Illegal function” was reported at the master.
  3. Verify that “Timeout Exception” was reported at the master.
  4. Run one of the commands "show serial profile all" or "show serial profile name YOUR_PROFILE_NAME" or "show serial profile interface serial 0/YOUR_INT_NUM" to verify the messages that were sent and received.

    Type the following:

    Phoenix_Contact# show serial profile interface all
    Profile : PROF_MOD_SERVER
    Protocol : Modbus
    Role                    : TCP Server
    Serial interface        : 9
    Slaves ID             : 1 12 13 14 15 16 17 18 19 20
    Serial byte counter   : 0
    Response time (msec)  : 2000
    Turnaround delay(msec): 0
    Hold time(msec)       : 0
    Rx-to-Tx delay(msec)  : 0
    Serial interface        : 10
    Slaves ID             : 2 22 23 24 25
    Serial byte counter   : 0
    Response time (msec)  : 50
    Turnaround delay(msec): 0
    Hold time(msec)       : 0
    Rx-to-Tx delay(msec)  : 0
    Local Server Port       : 502
    Max clients alowed      : 64
    Clients number          : 2
    Client  1 IP            : 192.168.0.100
    Client  1 port          : 57886
    Client  1 byte counter  : 0
    Client  2 IP            : 192.168.0.100
    Client  2 port          : 57889
    Client  2 byte counter  : 45
    KeepAlive interval (sec): 240
    Max pending messages    : 10
    Current pending messages: 0
    Send exceptions         : YES
    RXed from slave msg     : 0
    TXed to slave msg       : 2
    RXed from master msg    : 2
    TXed to master msg      : 1
    Exceptions created      : 1

Configuring Turnaround Delay

  1. Change turnaround delay to be 1000 msec for interface 0/10.

    Type the following:

    • Enter the Global Configuration Mode.
    Phoenix_Contact# configure terminal
    • Configure profile PROF_10_MOD_CLIENT.
    Phoenix_Contact(config)# serial connection-type modbus profile PROF_MOD_SERVER
    Phoenix_Contact(modbus-PROF_MOD_SERVER)# role server
    Phoenix_Contact(modbus-PROF_MOD_SERVER-server)# no connection-map
    Phoenix_Contact(modbus-PROF_MOD_SERVER-server)# end

    Phoenix_Contact# configure terminal
    Phoenix_Contact(config)# interface serial 0/10
    Phoenix_Contact(config-serial-if)# turnaround delay 1000 
    Phoenix_Contact(config-serial-if)# no shutdown
    Phoenix_Contact(config-serial-if)# end 

    Phoenix_Contact# configure terminal
    Phoenix_Contact(config)# serial connection-type modbus profile PROF_MOD_SERVER
    Phoenix_Contact(modbus-PROF_MOD_SERVER)# role server
    Phoenix_Contact(modbus-PROF_MOD_SERVER-server)# connection-map
    Phoenix_Contact(modbus-PROF_MOD_SERVER-server)# end
  2. Reconnect with Masters and Slaves.
  3. Run one of the commands "show serial profile all" or "show serial profile name YOUR_PROFILE_NAME" or "show serial profile interface serial 0/YOUR_INT_NUM" to verify that turnaround delay is 1000 msec for interface 0/10.

    Type the following:

    Phoenix_Contact# show serial profile interface all
    Profile : PROF_MOD_SERVER
    Protocol : Modbus
    Role                    : TCP Server
    Serial interface        : 9
    Slaves ID             : 1 12 13 14 15 16 17 18 19 20
    Serial byte counter   : 0
    Response time (msec)  : 2000
    Turnaround delay(msec): 0
    Hold time(msec)       : 0
    Rx-to-Tx delay(msec)  : 0
    Serial interface        : 10
    Slaves ID             : 2 22 23 24 25
    Serial byte counter   : 0
    Response time (msec)  : 50
    Turnaround delay(msec): 1000
    Hold time(msec)       : 0
    Rx-to-Tx delay(msec)  : 1000
    Local Server Port       : 502
    Max clients alowed      : 64
    Clients number          : 2
    Client  1 IP            : 192.168.0.100
    Client  1 port          : 56123
    Client  1 byte counter  : 0
    Client  2 IP            : 192.168.0.100
    Client  2 port          : 56124
    Client  2 byte counter  : 0
    KeepAlive interval (sec): 60
    Max pending messages    : 10
    Current pending messages: 0
    Send exceptions         : YES
    RXed from slave msg     : 0
    TXed to slave msg       : 0
    RXed from master msg    : 0
    TXed to master msg      : 0
    Exceptions created      : 0
  4. Read holding registers twice with no delay between reads.
  5. Verify that response arrives to the master immediately by looking in the Master’s Communication Traffic screen. In Master and Slave, the response appears right after the request.
  6. Read the holding registers twice. The second reading should be done immediately after the first time.
  7. Verify that the second response in the Slave’s Communication Traffic screen appears immediately after request, but in the Master’s Communication Traffic screen, the response appears approximately after 1 second.

Configuring Hold Time

  1. Unmap the profile. Set the hold time to 100 msec. Map the profile.

    Type the following:

    • Enter the Global Configuration Mode.
    Phoenix_Contact# configure terminal
    • Configure profile PROF_10_MOD_CLIENT.
    Phoenix_Contact(config)# serial connection-type modbus profile PROF_MOD_SERVER
    Phoenix_Contact(modbus-PROF_MOD_SERVER)# role server
    Phoenix_Contact(modbus-PROF_MOD_SERVER-server)# no connection-map
    Phoenix_Contact(modbus-PROF_MOD_SERVER-server)# end

    Phoenix_Contact# configure terminal
    Phoenix_Contact(config)# interface serial 0/10
    Phoenix_Contact(config-serial-if)# hold-time 100 
    Phoenix_Contact(config-serial-if)# no shutdown
    Phoenix_Contact(config-serial-if)# end 

    Phoenix_Contact# configure terminal
    Phoenix_Contact(config)# serial connection-type modbus profile PROF_MOD_SERVER
    Phoenix_Contact(modbus-PROF_MOD_SERVER)# role server
    Phoenix_Contact(modbus-PROF_MOD_SERVER-server)# connection-map
    Phoenix_Contact(modbus-PROF_MOD_SERVER-server)# end
  2. Connect Masters and Slaves.
  3. Run one of the commands "show serial profile all" or "show serial profile name YOUR_PROFILE_NAME" or "show serial profile interface serial 0/YOUR_INT_NUM" to verify that the hold time value is 100.

    Type the following:

    Phoenix_Contact# show serial profile interface all
    Profile : PROF_MOD_SERVER
    Protocol : Modbus
    Role                    : TCP Server
    Serial interface        : 9
    Slaves ID             : 1 12 13 14 15 16 17 18 19 20
    Serial byte counter   : 0
    Response time (msec)  : 2000
    Turnaround delay(msec): 0
    Hold time(msec)       : 0
    Rx-to-Tx delay(msec)  : 0
    Serial interface        : 10
    Slaves ID             : 2 22 23 24 25
    Serial byte counter   : 0
    Response time (msec)  : 50
    Turnaround delay(msec): 1000
    Hold time(msec)       : 100
    Rx-to-Tx delay(msec)  : 0
    Local Server Port       : 502
    Max clients alowed      : 64
    Clients number          : 2
    Client  1 IP            : 192.168.0.100
    Client  1 port          : 56655
    Client  1 byte counter  : 0
    Client  2 IP            : 192.168.0.100
    Client  2 port          : 56656
    Client  2 byte counter  : 0
    KeepAlive interval (sec): 60
    Max pending messages    : 10
    Current pending messages: 0
    Send exceptions         : YES
    RXed from slave msg     : 0
    TXed to slave msg       : 0
    RXed from master msg    : 0
    TXed to master msg      : 0
    Exceptions created      : 0
  4. Read holding registers from the slave.
  5. Verify that response arrives to the master immediately by looking in the Communication Traffic screen. In Master and Slave, the response appears right after the request.
  6. Read holding registers twice. The second reading should be done immediately after the first time.
  7. Verify that the second response in the Slave’s Communication Traffic screen appears immediately after request, but in the Master’s Communication Traffic screen, the response appears approximately after 100 milliseconds. It can be visually distinguished from 1 sec.

Clearing Serial Configuration and Deleting the Profile

Unmap the profile. Set the rx-to-tx delay to 100 msec. Map the profile.

Type the following:

  • Enter the Global Configuration Mode.
Phoenix_Contact# configure terminal
  • Configure profile PROF_10_MOD_CLIENT.
Phoenix_Contact(config)# no serial profile PROF_MOD_SERVER
Phoenix_Contact(config)# end

Phoenix_Contact# configure terminal
Phoenix_Contact(config)# interface serial 0/10
Phoenix_Contact(config-serial-if)# rx-to-tx delay 0 
Phoenix_Contact(config-serial-if)# no shutdown
Phoenix_Contact(config-serial-if)# end